The Sunken Temple of Qarn
The Sunken Temple of Qarn

- Level
- 35 (Sync: 37)
- Difficulty
- Normal
- Party size
- Light Party
4 man • 1 1
1  2
2 
- Unsyncing
- Allowed
- Time limit
- 90 minutes
- Phoenix Down
- Available
- Duty Finder
- Dungeons (A Realm Reborn)
- Roulette
- Leveling
- Req. quest
- Braving New Depths
- Entrance
- Southern Thanalan (X:25, Y:12)
- Region
- Thanalan
- Modes
 Explorer
 Duty Support
- Patch
- 2.0
- Links
- EDB GT TC
Under the unforgiving Thanalan sun lie and ruins of an ancient temple half-devoured by the shifting sands of timeless desert. Though used by ancient Belah'dians as a place to worship the sun goddess, Azeyma, the massive underground structure appears to be far older than his Sixth Astral Era civilization. That, however, did not deter Belah'dian sultans from each adding their own chambers to the original construct to a bid to achieve immortality through creation. In the subsequent years since the fall of Belah'dia, many an adventurer has sought to explore the temple's mysteries and perhaps return with the treasure of a lost era... Only to fall victim to one of the complex traps set to prevent that very thing from happening.
— In-game description
The Sunken Temple of Qarn is a level 35 dungeon introduced in patch 2.0. Duty Support for this dungeon was added in patch 7.2, along with changes to the dungeon itself.
Duty Support
| Scion Marauder | Scion Conjurer | Scion Thaumaturge | Scion Lancer | |
|---|---|---|---|---|

|

|

|

| |
| Class | ||||
| Role | Tank | Healer | DPS | DPS |
Objectives
- Clear the Oratory of Tatamefu II: 0/1
- Clear the Rosarium of Lalafuto I: 0/1
- Clear the Adytum of Lalafuto IV: 0/1
- Tip the Scales of Judgment: 0/1
- Defeat the adjudicator: 0/1
Walkthrough
Optimal pathing for the dungeon is as follows (this skips optional side rooms and requires only opening the minimum number of doors needed to progress to the end):
- At the start, hug the right wall to prevent aggroing the first group of enemies.
- Continue onward, defeating enemies in the way. Do not need to pick up any objects.
- Defeat Teratotaur.
- Continue until reaching the first closing door and defeat the immobile Avoirdupois to open the door.
- Ignore the two Avoirdupois in the outside area. Continue north into the underground area and defeat the enemies or keep pulling.
- Defeat the Temple Guardian.
- Continue onwards to the outside area.
- Defeat the Avoirdupois on the glowing tile.
- Go up the stairs and defeat the final Avoirdupois on the glowing tile.
- Continue until reaching the scales. Interact with the Scales of Judgment to spawn 3 enemies. Defeat them to unlock the final boss chamber.

Optional Bonus Rooms
- The Vault of Steel (bottom left) - Use the Helm of Might
- The Vault of Wealth (bottom right) - Use the Gem of Affluence
- The Vault of Aether (top left) - Use the Flame of Magic
- The Vault of Secrets (top right)- Use the Fruit of Knowledge
Scales of Judgment
On the Scales of Judgment, the optional puzzle at the end of the dungeon, players should place:
- The Flame of Magic (the flame symbol) on the left pan.
- The Fruit of Knowledge (the grapes symbol) on the right pan.
"Tip the Scales of Judgement" will lock in the party's choices. If no or the incorrect objects are placed, three of The Condemned will spawn. After defeating them, the door to the final boss will open. If the correct objects are placed, the door to a side room containing an extra treasure coffer will open, in addition to the final boss room.
As the loot from the extra chests is usually of little value, many parties will skip collecting the items and will ignore the scales puzzle and earlier side rooms.
Visiting all side rooms is required for the Mapping the Realm: Sunken Temple of Qarn achievement. Players who wish to obtain this achievement should use Duty Support, communicate with the party that they would like to open all side rooms, or run the dungeon solo with Unrestricted Party (unsyncing) settings when they are of sufficiently high level.
Enemies
- Temple Bat
- The Accused
- Temple Bee (uses blue mage spell Final Sting)
- Qarn Facer
- Dung Wespe (uses blue mage spell Final Sting)
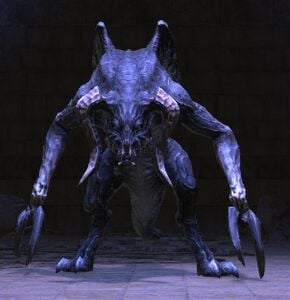
- Death Claw
- Avoirdupois
- Wall Crawler
- The Condemned
- Golem Soulstone
- Temple Croc
- Mythril Verge
Bosses
Teratotaur is the first boss of The Sunken Temple of Qarn. The boss fight has multiple instant death mechanics, involving adds and three square plates positioned around the arena.
- Triclip: Telegraphed tankbuster.
- Dung wespes have joined the fray! Two Dung Wespe adds will spawn. Kill these quickly or they will use Final Sting on their target and deal massive damage (70% of their maximum HP; two hits will be instant death).
- Frightful Roar: Telegraphed point-blank AoE. Anyone hit will receive a 15-second
 Physical Vulnerability Up which can be cleansed with Esuna.
 - Mow: Telegraphed frontal conal AoE. Anyone hit will receive a 15-second
 Poison which can be cleansed with Esuna.
 - Mortal Ray: You have been afflicted with Doom... A room-wide AoE that will inflict everyone with a
 Doom debuff on your entire party; the debuff lasts 12 seconds and will instantly kill anyone still afflicted by it when the timer ends.
- The boss can be stunned (using actions such as Low Blow or Leg Sweep during the cast to prevent it.
- Players can remove this debuff by stepping on the square plate that is glowing orange; only one of them will turn orange at a time. It may be preferable to tank the Teratotaur in the middle of the room between all three plates so that they are within easy reach of the Tank and Melee DPS, but the duration is long enough that it should not be a problem.
Temple Guardian is a gigantic rock golem boss. Throughout the fight, Temple Guardian will spawn ![]() Golem Soulstone onto its chest. While the Soulstone is alive, Temple Guardian takes virtually no damage. When the Golem Soulstone is destroyed, the golem is
Golem Soulstone onto its chest. While the Soulstone is alive, Temple Guardian takes virtually no damage. When the Golem Soulstone is destroyed, the golem is ![]() stunned and becomes vulnerable for a period of time before the Soulstone respawns. Players should switch their target to the Soulstone when it spawns. The Guardian will target random players with most of his abilities. To save time, it is recommended to use a DPS (preferably melee) limit break on the Guardian to increase the chances of killing it when it becomes vulnerable the first time, before the Soulstone respawns.
stunned and becomes vulnerable for a period of time before the Soulstone respawns. Players should switch their target to the Soulstone when it spawns. The Guardian will target random players with most of his abilities. To save time, it is recommended to use a DPS (preferably melee) limit break on the Guardian to increase the chances of killing it when it becomes vulnerable the first time, before the Soulstone respawns.
Abilities
- Rockslide is a frontal column AoE attack.
- True Grit is a frontal cone AoE attack that will inflict a 15-second
 Blind which can be cleansed with Esuna.
 - Boulder Clap is a frontal AoE attack.
- Obliterate is an instant attack that deals magical damage to the entire party.
- Stone Skull is an instant attack that damages one player, knocks them back, and stuns them for 3 seconds.
Adjudicator is the final boss of The Sunken Temple of Qarn. Throughout the fight, it will spawn various Mythril Verges on the ground.
- Looming Judgment: Telegraphed tankbuster.
- Summon: The adjudicator summons arcane instruments! Spawns two Mythril Verges. Defeat these adds as soon as possible.
- These will aim at at random players with Verge Line, a blue telegraphed line AoE.
- Each time they use their AoE, they will gain a stack of Haste, increasing the rate of their attacks.
- If the adds reach 6 stacks, they will instantly explode with Self-Destruct for high party-wide damage.
- Creeping Darkness: Party-wide magical damage.
- Summon: The adjudicator summons arcane instruments! Now spawns four Mythril Verges, one per corner.
- Each add will chain a player, briefly stunning and drawing them in, inflicting
 bind.
bind. - All players will then be targeted with Verge Pulse by their respective add. If it connects, the player will instantly die. Players must defeat their adds to free themselves and dodge the AoE. Freed players should help defeat other adds to free their allies.
- Each add will chain a player, briefly stunning and drawing them in, inflicting
- Dark II: A massive telegraphed conal AoE aimed at a random player. To facilitate dodging, do not be too far away from the boss.
- Dark: A telegraphed circle AoE at one random player's current location.
- Summon: Summons four Mythril verges again, but similar to the first usage of this attack (without players being chained).
Loot
| Name | Type | Item Level | Rarity | Quantity |
|---|---|---|---|---|
| Qarn Circlet | Head | 37 | Green | 1 |
| Qarn Goggles | Head | 37 | Green | 1 |
| Qarn Vambraces | Hands | 37 | Green | 1 |
| Qarn Gloves | Hands | 37 | Green | 1 |
| Qarn Halfgloves | Hands | 37 | Green | 1 |
| Name | Type | Item Level | Rarity | Quantity |
|---|---|---|---|---|
| Qarn Chainmail | Body | 37 | Green | 1 |
| Qarn Jackcoat | Body | 37 | Green | 1 |
| Qarn Cowl | Body | 37 | Green | 1 |
| Qarn Breeches of Resilience | Legs | 37 | Green | 1 |
| Qarn Breeches of War | Legs | 37 | Green | 1 |
| Qarn Breeches of Magic | Legs | 37 | Green | 1 |
| Name | Type | Item Level | Rarity | Quantity |
|---|---|---|---|---|
| Paladin's Flametongue Arms (Lv. 35) | Other | 1 | Green | 1 |
| Boar's Bane | Marauder's Arm | 37 | Green | 1 |
| Platoon Sword | Dark Knight's Arm | 37 | Green | 1 |
| Shellsplitter | Lancer's Arm | 37 | Green | 1 |
| Fists of the Sixth Sun | Pugilist's Arm | 37 | Green | 1 |
| Banos Del Sol | Rogue's Arm | 37 | Green | 1 |
| Kokoroon's Nestpicker | Archer's Arm | 37 | Green | 1 |
| Hellfire | Machinist's Arm | 37 | Green | 1 |
| Anathema | One-handed Thaumaturge's Arm | 37 | Green | 1 |
| Pupil's Book of Silver | Arcanist's Grimoire | 37 | Green | 1 |
| Bloodcry | Two-handed Conjurer's Arm | 37 | Green | 1 |
| Altair | Astrologian's Arm | 37 | Green | 1 |
| Qarn Boots | Feet | 37 | Green | 1 |
| Qarn Jackboots | Feet | 37 | Green | 1 |
| Qarn Duckbills | Feet | 37 | Green | 1 |
| Belah'dian Glass | Material | 50 | Basic | 1 |
| Echoes of Ages Past Orchestrion Roll | Other | 1 | Basic | 1 |
Treasure Coffers
 Treasure Coffer 1 (X:13.0, Y:10.1)
| Name | Type | Item Level | Rarity | Quantity |
|---|---|---|---|---|
| Fire Shard | Other | 1 | Basic | 1 |
| Ice Shard | Other | 1 | Basic | 1 |
| Wind Shard | Other | 1 | Basic | 1 |
| Earth Shard | Other | 1 | Basic | 1 |
| Lightning Shard | Other | 1 | Basic | 1 |
| Water Shard | Other | 1 | Basic | 1 |
Treasure Coffer 2 (X:13.0, Y:12.3)
| Name | Type | Item Level | Rarity | Quantity |
|---|---|---|---|---|
| Fire Shard | Other | 1 | Basic | 1 |
| Ice Shard | Other | 1 | Basic | 1 |
| Wind Shard | Other | 1 | Basic | 1 |
| Earth Shard | Other | 1 | Basic | 1 |
| Lightning Shard | Other | 1 | Basic | 1 |
| Water Shard | Other | 1 | Basic | 1 |
Treasure Coffer 3 (X:14.2, Y:10.3)
| Name | Type | Item Level | Rarity | Quantity |
|---|---|---|---|---|
| Fire Shard | Other | 1 | Basic | 1 |
| Ice Shard | Other | 1 | Basic | 1 |
| Wind Shard | Other | 1 | Basic | 1 |
| Earth Shard | Other | 1 | Basic | 1 |
| Lightning Shard | Other | 1 | Basic | 1 |
| Water Shard | Other | 1 | Basic | 1 |
Treasure Coffer 4 (X:15.0, Y:10.4)
| Name | Type | Item Level | Rarity | Quantity |
|---|---|---|---|---|
| Fire Shard | Other | 1 | Basic | 1 |
| Ice Shard | Other | 1 | Basic | 1 |
| Wind Shard | Other | 1 | Basic | 1 |
| Earth Shard | Other | 1 | Basic | 1 |
| Lightning Shard | Other | 1 | Basic | 1 |
| Water Shard | Other | 1 | Basic | 1 |
Treasure Coffer 5 (X:12.9, Y:11.1)
Dropped by the first Qarn Facer you come across.
| Name | Type | Item Level | Rarity | Quantity |
|---|---|---|---|---|
| Paladin's Flametongue Arms (Lv. 35) | Other | 1 | Green | 1 |
| Boar's Bane | Marauder's Arm | 37 | Green | 1 |
| Platoon Sword | Dark Knight's Arm | 37 | Green | 1 |
| Shellsplitter | Lancer's Arm | 37 | Green | 1 |
| Fists of the Sixth Sun | Pugilist's Arm | 37 | Green | 1 |
| Banos Del Sol | Rogue's Arm | 37 | Green | 1 |
| Kokoroon's Nestpicker | Archer's Arm | 37 | Green | 1 |
| Hellfire | Machinist's Arm | 37 | Green | 1 |
| Anathema | One-handed Thaumaturge's Arm | 37 | Green | 1 |
| Pupil's Book of Silver | Arcanist's Grimoire | 37 | Green | 1 |
| Bloodcry | Two-handed Conjurer's Arm | 37 | Green | 1 |
| Altair | Astrologian's Arm | 37 | Green | 1 |
Treasure Coffer 6 (X:14.2, Y:12.1)
| Name | Type | Item Level | Rarity | Quantity |
|---|---|---|---|---|
| Qarn Boots | Feet | 37 | Green | 1 |
| Qarn Jackboots | Feet | 37 | Green | 1 |
| Qarn Duckbills | Feet | 37 | Green | 1 |
| Belah'dian Glass | Material | 50 | Basic | 1 |
| Echoes of Ages Past Orchestrion Roll | Other | 1 | Basic | 1 |
Treasure Coffer 7 (X:15.1, Y:10.4)
| Name | Type | Item Level | Rarity | Quantity |
|---|---|---|---|---|
| Qarn Circlet | Head | 37 | Green | 1 |
| Qarn Goggles | Head | 37 | Green | 1 |
| Qarn Vambraces | Hands | 37 | Green | 1 |
| Qarn Gloves | Hands | 37 | Green | 1 |
| Qarn Halfgloves | Hands | 37 | Green | 1 |
Treasure Coffer 8 (X:14.9, Y:10.3)
| Name | Type | Item Level | Rarity | Quantity |
|---|---|---|---|---|
| Qarn Chainmail | Body | 37 | Green | 1 |
| Qarn Jackcoat | Body | 37 | Green | 1 |
| Qarn Cowl | Body | 37 | Green | 1 |
| Qarn Breeches of Resilience | Legs | 37 | Green | 1 |
| Qarn Breeches of War | Legs | 37 | Green | 1 |
| Qarn Breeches of Magic | Legs | 37 | Green | 1 |
Achievements
This duty is associated with the following achievements:
| Name | Points | Task | Reward | Patch |
|---|---|---|---|---|
| Mapping the Realm: Sunken Temple of Qarn | 10 | Discover every location within the Sunken Temple of Qarn. | - | 2.0 |
Music
| Condition | Theme |
|---|---|
| Main | Echoes of Ages Past |
| Battle | A Fell Air Falleth |
| Mid-Bosses | A Fine Death |
| Final Boss | Nemesis |
Gallery
Gear Images


Dungeon Images
-
-
-

-
 The Sunken Temple of Qarn seen during the game credits


Lore
The Temple To The Sun Goddess
In the south of sunbaked Thanalan, half devoured by the shifting sands, there lie the ruins of an ancient temple.
Formerly used by the Belah'dians as a place to worship the sun goddess, Azeyma, its construction is credited to Tatamefu II, with further expansion taking place over generations under the auspices of sovereigns such as Lalafuto I, Lalafuto III, and Memeto the Meek. Financial woes, however, put a stop to Lalafuto IV's bid to expand underground, and all such work would be forever ended when a war of succession broke out between two princes and the kingdom was torn in twain.
In the years since the fall of Belah'dia, many souls have sought to plumb the temples mysteries, but the devious traps that riddle its halls have frustrated the efforts of explorers and thieves alike.
Temple Guardian
Brought to life with knowledge inherited from the Mhach civilization, these guardians of stone dutifully and tirelessly attend to those who would defile the temple. To be spared their attentions, one must bear the guise of a genuine worshiper, but few such implements have survived the passage of time.
The Perils Of Nenekko
Owing to the efforts of sure-footed adventurers, the Sunken Temple of Qarn was made safe, and a partnership between the Order of Nald'thal and Amajina & Sons Mineral Concern sent forth a joint expedition to coax out its secrets.
Alas, by then the rumors of hidden treasure had reached the ears of the rapacious and reckless, whose blundering presence in the ruins awakened yet more arcane traps and left the expedition stranded amidst deadly dangers. A team of adventurers familiar with the temple’s workings was promptly dispatched to rescue the civilians, with an express focus on the young scholar Nenekko, daughter to the chairman of Amajina & Sons.
Had this mission failed, it is said that the Concern’s private army, the Stone Torches, stood ready to mount its own rescue with the entirety of its resources.
Vicegerent to the Warden
This ancient sentinel was accidentally roused in the course of excavation. In contrast to the temple guardian’s rough-hewn appearance, Which marks it as a product of early Beah dia, the vicegerent is a thing of precision created in the kingdoms later years. In this way, it is possible to appreciate the advances made in guardian construction techniques through out the ages.
History
The following changes were made with patch 7.2:
- The Avoirdupois enemies are now immobile and always spawn on the glowing tile. Previously, these enemies must be moved by the tank and defeated on the glowing tiles to open doors. If they were not defeated on a glowing tile, they would revive.
- Teratotaur:
- The Triclip tankbuster now has a cast bar and standard red tankbuster indicator instead of being an instant attack.
- The Dung Wespe spawns are now accompanied with a red combat message that was introduced in Dawntrail.
- The Mortal Ray cast is now accompanied with a red combat message warning the player has been inflicted with Doom.
- Adjudicator:
- Boss entirely overhauled.
- Looming Judgment (telegraphed tankbuster) added.
- Sun Juror adds removed.
- Mythril Verges now get a stacking Haste debuff, increasing the rate of their AoEs.
- Self-selection barriers on Mythril Verges have been removed. These were dark boxes around them that caused players outside the region to do reduced damage to them. Eventually, they would have sealed off and only allowed players inside the square to damage them.
- Bind mechanic with four Mythril Verges added.
- Darkness (a small telegraphed conal AoE) removed and replaced with Dark II (a massive telegraphed frontal conal AoE) and Dark (a telegraphed circle AoE on a random player).
- Interruptable paralysis attack removed.
| A Realm Reborn (Lv. 15-50) | |||||
|---|---|---|---|---|---|
| Heavensward (Lv. 51-60) | |||||
| Stormblood (Lv. 61-70) | |||||
| Shadowbringers (Lv. 71-80) | |||||
| Endwalker (Lv. 81-90) | |||||
| Dawntrail (Lv. 91-100) | |||||
| Seasonal |
| ||||