Amdapor Keep
Amdapor Keep
- Level
- 50 (Sync: 50)
- Item Level
- 45 (Sync: 110)
- Difficulty
- Normal
- Party size
- Light Party
4 man • 1 1
1  2
2 
- Unsyncing
- Allowed
- Time limit
- 90 minutes
- Phoenix Down
- Available
- Duty Finder
- Dungeons (A Realm Reborn)
- Roulette
- High-level Dungeons
- Tomestones
 20
20 - Req. quest
- Ghosts of Amdapor
- Entrance
- South Shroud (X:24.8, Y:24.9)
- Region
- The Black Shroud
- Modes
 Explorer
- Patch
- 2.0
Once, the lost civilization of Amdapor thrived in the Twelveswood, her citizens wielders of powerful, yet forbidden magicks which could be used to alter the very fabric of existence. However, as is oft the case with peoples who fancy themselves gods, the self-assuring hubris of the Amdapori eventually became their downfall, and as quickly as they rose to power, did they disappear from the world. For generations, this relic of their once-mighty civilization has remained hidden in plain sight─cloaked by the elementals who sought only to prevent newer generations from stumbling across the ancient Amdapori magicks. That is, until the Lambs of Dalamud─a dark cult who worships the now-fallen lesser moon as a god─dispelled the elementals' glamour by means unknown, and claimed the keep as their own. Now the crazed followers use its ancient chambers to perform blood sacrifices in an effort to resurrect their evil lord.
— In-game description
Amdapor Keep is a level 50 dungeon introduced in patch 2.0.
Objectives
- Clear the Gier Hall: 0/1
- Clear the Bloody Transept: 0/1
- Defeat Anantaboga: 0/1
Enemies
- Lunatic Follower
- Soul Collector
- Recluse Hippogryph
- Dullahan
- Stone Marionette
- Marble Marionette
- Megalith Marionette
- Hound Light
- Brontotaur
- Vodoriga Sleeper
- Bloodlapper
- Succubus
- Smolenkos
- Dark Helot
Bosses
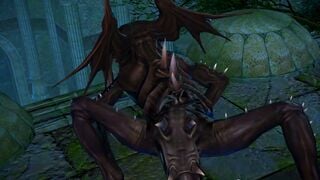
At first only the Lunatic Priest is present. He has a circular AoE spell named Void Fire II that players should avoid. At around half HP, he will summon the Psycheflayer. (Unlike the trash, this can't be stopped by killing him before he finishes Void Call.) Burst down the Lunatic Priest while the tank pulls the Psycheflayer to the far right side of the room, near the lantern.
Players should attempt to interrupt Void Fire III with stuns (or Interject / Head Graze) and avoid Void Fire II by moving out of the ground indicator. Healers should remove the Disease debuff with Esuna if possible.
Psycheflayer will spawn Stone Marionette and Marble Marionette throughout the fight. Be sure to kill them as soon as they spawn. Players should avoid Stone Marionette's frontal column AoE ability and interrupt Marble Marionette's Obliterate spell.
At around half HP, Psycheflayer will summon the Megalith Marionette. (This can be stopped by killing him, if you're playing unsynced.) The giant golem will slowly walk around the boss room and cast Plaincracker, the giant circular AoE ability, occasionally. When you are positioned at the right side of the room, near the lantern, you can easily avoid Plaincracker by hugging the right wall. Players should ignore Megalith Marionette and keep their focus on the Psycheflayer.
Abilities
- Water is a spell that deals a small amount of damage to a player.
- Void Thunder III is a spell that deals a large amount of damage to a player.
- Canker is a spell that deals the debuff Disease on a random player.
- Mind Melt is an instant ability that deals a moderate amount of damage to all players near Psycheflayer.
Adds
- Lunatic Priest is the add that summons Psycheflayer. Players should dodge his circular AoE spell named Void Fire II. At around half HP, He summons the Psycheflayer.
- Stone Marionette has a frontal column AoE ability named Rockslide. It deals heavy damage to all players hit.
- Marble Marionette has a spell named Obliterate that deals a moderate amount of damage to all players nearby.
- Megalith Marionette has a very large circular AoE attack that centers around itself. The attack, named Plaincracker, deals massive amount of damage to all players hit.
Demon Wall will use his abilities in a pattern. He will first use Liquefy (Middle), followed by Liquefy (Sides). After two rotations of these abilities, Demon Wall will use Repel. Players should move to the edges of the platform when Demon Wall uses Liquefy (Middle), a dark column in the center of the room. Players should move to the center when Demon Wall uses Liquefy (Sides), dark columns in the left and right sides of the room. When the Demon Wall uses Repel, players should be in the center of the boss room to avoid being thrown off the platform.
- Liquefy (Middle) -> Liquefy (Sides) -> Liquefy (Middle) -> Liquefy (Sides) -> Repel
After Demon Wall uses a second Repel, a dark pool spawns in the back of the platform. Avoid the dark pool if possible. He will also summon 2 adds named Bloodlapper. Bloodlapper can paralyze players with AoE spells. Interrupt their casting of Thunderstorm and kill them as soon as possible.
Abilities
- Murder Hole is an instant ability that deals a small amount of damage to a random player.
- Repel is an ability that knocks all players back and deals a moderate amount of damage.
- Liquefy (Middle) is an ability that spawns a long black column in the middle of the boss room. It will do a large amount of damage and inflict the debuff Heavy to all players hit.
- Liquefy (Sides) is an ability that spawns two long black columns at the sides of the boss room. It will do a large amount of damage and inflict the debuff Slow to all players hit.
Adds
- Bloodlapper has an ability named Thunderstorm. Thunderstorm is a circular AoE spell that inflicts the debuff Paralysis to all targets caught within. The spell should be interrupted with a stun because it is difficult to avoid the ground indicator.
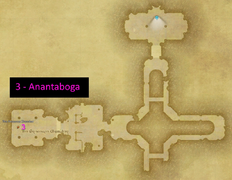
Anantaboga is the final boss of Amdapor Keep. Non-tank players should be Flanking the boss to avoid its Rotten Breath (front conal AoE) and Tail Drive (rear conal AoE). Rotten Breath will apply the debuff Disease to all targets hit. Disease will reduce all healing done to the target. Healers should remove disease with Esuna if possible.
Throughout the fight Anantaboga will use Imminent Catastrophe to spawn purplish, red orbs in the center of the boss room. The orbs will do damage to all players in its line of sight. Be sure to hide behind the statues around the room to avoid the damage. Additionally, the ability will awake one of the statues. Avoid the statue's circular AoE attack and burst it down.
Later in the fight Anantaboga will use Plague Dance on random players. Players with the debuff should move away from statues and other players so the red orbs will not damage any other players. The red orbs disappear when Anantaboga uses Imminent Catastrophe.
Abilities
- The Look is an instant attack that deals a small amount of damage to the target with the most enmity.
- Tail Drive is a rear cone AoE attack that deals high amount of damage and inflicts a DoT named Concussion to all players hit. Anantaboga will only use this ability when one or more players are behind it.
- Rotten Breath is a frontal AoE attack which deals heavy damage and inflicts the debuff Disease to all players hit.
- Imminent Catastrophe is a giant purplish, red orb that appears in the middle of the room. It deals heavy damage to all players in the line of sight.
- Plague Dance is a purple beam that targets a random player. After a few seconds, a small red orb appears at the location and deals damage to all players nearby.
Adds
- Dark Helot has an ability named Terror Eye that places a circular AoE under a random player. It deals heavy damage to all players caught within.
Loot
| Name | Type | Item Level | Rarity | Quantity |
|---|---|---|---|---|
| Mercenary's Mitts | Hands | 55 | Green | 1 |
| Mercenary's Pot Helm | Head | 55 | Green | 1 |
| Sipahi Gloves | Hands | 55 | Green | 1 |
| Sipahi Turban | Head | 55 | Green | 1 |
| Vermilion Chain Coif | Head | 55 | Green | 1 |
| Warlock's Hat | Head | 55 | Green | 1 |
| Warlock's Ringbands | Hands | 55 | Green | 1 |
| Name | Type | Item Level | Rarity | Quantity |
|---|---|---|---|---|
| Alpine War Jacket | Body | 55 | Green | 1 |
| Mercenary's Acton | Body | 55 | Green | 1 |
| Mercenary's Slops | Legs | 55 | Green | 1 |
| Sipahi Sarouel | Legs | 55 | Green | 1 |
| Sipahi Shirt | Body | 55 | Green | 1 |
| Vermilion Haubergeon | Body | 55 | Green | 1 |
| Vermilion Skirt | Legs | 55 | Green | 1 |
| Warlock's Robe | Body | 55 | Green | 1 |
| Warlock's Tights | Legs | 55 | Green | 1 |
 10 Allagan Tomestone of Poetics
- Demon Wall Card (Drops at a fixed rate)
| Name | Type | Item Level | Rarity | Quantity |
|---|---|---|---|---|
| Cracks in the Wall Orchestrion Roll | Other | N/A | Basic | 1 |
| Darklight Arquebus | Machinist's Arm | 55 | Green | 1 |
| Darklight Baghnakhs | Pugilist's Arm | 55 | Green | 1 |
| Darklight Baselards | Rogue's Arm | 55 | Green | 1 |
| Darklight Bill | Marauder's Arm | 55 | Green | 1 |
| Darklight Composite Bow | Archer's Arm | 55 | Green | 1 |
| Darklight Greatsword | Dark Knight's Arm | 55 | Green | 1 |
| Darklight Grimoire | Arcanist's Grimoire | 55 | Green | 1 |
| Darklight Harpoon | Lancer's Arm | 55 | Green | 1 |
| Darklight Kple Kple | Two-handed Conjurer's Arm | 55 | Green | 1 |
| Darklight Planisphere | Astrologian's Arm | 55 | Green | 1 |
| Darklight Square Shield | Shield | 55 | Green | 1 |
| Darklight Staff | Two-handed Thaumaturge's Arm | 55 | Green | 1 |
| Mercenary's Leggings | Feet | 55 | Green | 1 |
| Paladin's Darklight Arms (IL 55) | Other | N/A | Green | 1 |
| Sipahi Crakows | Feet | 55 | Green | 1 |
| The Look | N/A | 1 | ||
| Vermilion Sollerets | Feet | 55 | Green | 1 |
| Warlock's Pattens | Feet | 55 | Green | 1 |
Other Loot
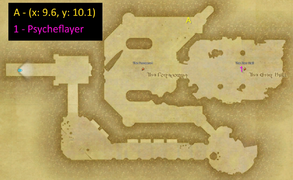
 Treasure Coffer 1 (X: 9.6 Y: 10.1)
| Name | Type | Item Level | Rarity | Quantity |
|---|---|---|---|---|
| Vermilion Sollerets | Feet | 55 | Green | 1 |
| Sipahi Crakows | Feet | 55 | Green | 1 |
| Mercenary's Leggings | Feet | 55 | Green | 1 |
| Warlock's Pattens | Feet | 55 | Green | 1 |
| Demon Brick | Minion | N/A | Basic | 1 |
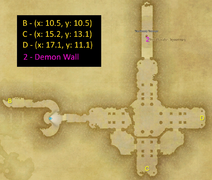
 Treasure Coffer 2 (X: 10.5 Y: 10.5)
| Name | Type | Item Level | Rarity | Quantity |
|---|---|---|---|---|
| Vermilion Chain Coif | Head | 55 | Green | 1 |
| Sipahi Turban | Head | 55 | Green | 1 |
| Mercenary's Pot Helm | Head | 55 | Green | 1 |
| Warlock's Hat | Head | 55 | Green | 1 |
| Sipahi Gloves | Hands | 55 | Green | 1 |
| Mercenary's Mitts | Hands | 55 | Green | 1 |
| Warlock's Ringbands | Hands | 55 | Green | 1 |
 Treasure Coffer 3 (X: 15.2 Y: 13.1)
| Name | Type | Item Level | Rarity | Quantity |
|---|---|---|---|---|
| Vermilion Haubergeon | Body | 55 | Green | 1 |
| Alpine War Jacket | Body | 55 | Green | 1 |
| Sipahi Shirt | Body | 55 | Green | 1 |
| Mercenary's Acton | Body | 55 | Green | 1 |
| Warlock's Robe | Body | 55 | Green | 1 |
| Vermilion Skirt | Legs | 55 | Green | 1 |
| Sipahi Sarouel | Legs | 55 | Green | 1 |
| Mercenary's Slops | Legs | 55 | Green | 1 |
| Warlock's Tights | Legs | 55 | Green | 1 |
 Treasure Coffer 4 (X: 17.1 Y: 11.1)
| Name | Type | Item Level | Rarity | Quantity |
|---|---|---|---|---|
| Paladin's Darklight Arms (IL 55) | Other | N/A | Green | 1 |
| Darklight Bill | Marauder's Arm | 55 | Green | 1 |
| Darklight Greatsword | Dark Knight's Arm | 55 | Green | 1 |
| Darklight Harpoon | Lancer's Arm | 55 | Green | 1 |
| Darklight Baghnakhs | Pugilist's Arm | 55 | Green | 1 |
| Darklight Baselards | Rogue's Arm | 55 | Green | 1 |
| Darklight Composite Bow | Archer's Arm | 55 | Green | 1 |
| Darklight Arquebus | Machinist's Arm | 55 | Green | 1 |
| Darklight Staff | Two-handed Thaumaturge's Arm | 55 | Green | 1 |
| Darklight Grimoire | Arcanist's Grimoire | 55 | Green | 1 |
| Darklight Kple Kple | Two-handed Conjurer's Arm | 55 | Green | 1 |
| Darklight Planisphere | Astrologian's Arm | 55 | Green | 1 |
| Darklight Square Shield | Shield | 55 | Green | 1 |
| Amdapori Stone | Material | N/A | Basic | 1 |
Achievements
This duty is associated with the following achievements:
| Name | Points | Task | Reward | Patch |
|---|---|---|---|---|
| Mapping the Realm: Amdapor Keep | 10 | Discover every location within Amdapor Keep. | - | 2.0 |
Music
| Condition | Theme |
|---|---|
| Main | Cracks in the Wall |
| Battle | A Fell Air Falleth |
| Mid-Bosses | A Fine Death |
| Final Boss | Nemesis |
Images
Lore
Voices From The Keep
This ancient keep remained hidden in plain sight for generations, cloaked by the magicks of the elementals, until the violence of the Calamity weakened their powers and the glamours eventually failed. Up to that point blissfully unaware of its existence, the citizens of Gridania were shocked when its sprawling ruins suddenly appeared in the middle of the Twelveswood.
Identified as relic of Amdapor, a Fifth Astral Era nation credited with creating white magic, the keep was likely abandoned in the wake of a devastating attack by their archenemies, the Mhachi. Nonetheless, much of the civilization’s ingenuity survived both the carnage and the passage of time to remain in evidence. Aside from their mastery of healing and purification magicks, the Amdapori are noted for their skill at creating arcane entities of stone, the demon wall being a prime specimen. Many such beings served as the keep’s guardians in its heyday—and still did so the day it was rediscovered.
Even the presence of such stout defenses, however, did not deter the fanatics of the Lambs of Dalamud, who ventured into the keep and proceeded to use its chambers for their dark rituals.
Anantaboga
Inside the keep, the Lambs of Dalamud sought to bend voidsent to their will. The creature was Anantaboga, and it was presumably among the void army the Mhachi once sent to lay waste to Amdapor. That it had been sealed away suggests that the white mages fell short of destroying it outright.
Malefic Resurgence
Though purging the Lambs of Dalamud brought a hard-earned peace unto Amdapor Keep, some mysterious fiend completed the cultists' rites and ushered shadows back into the ruins. Voidsent reveled anew within these walls, their wickedness warping the flora and transforming kindly woodland creatures, even placid herbivores, into bloodthirsty beasts.
Sensing the disturbance, Seedseer A-Ruhn-Senna bade the Hearer Adestan seek out the selfsame adventurer who had previously conquered the evil within Amdapor Keep that he might repeat his feats. Most fortuitously, the hero was soon found, and he set forth once more into the ruins to uncover the source of the darkness and rid the Twelveswood of its corrupting influence.
Ferdiad
A high-ranking voidsent summoned by Mhachi voidmages to join the assault on Amdapor. Vanquished by adventurers in Amdapor Keep, he survived to later appear in the Weeping City of Mhach, doing his lord Diabolos’s bidding.


