The Minstrel's Ballad: Thordan's Reign
The Minstrel's Ballad: Thordan's Reign

- Level
- 60 (Sync: 60)
- Item Level
- 190
- Difficulty
- Extreme
- Party size
- Full Party
8 man • 2 2
2  4
4 
- Unsyncing
- Allowed
- Time limit
- 60 minutes
- Phoenix Down
- Not Available
- Duty Finder
- High-end Trials (Heavensward)
- Roulette
- Mentor
- Tomestones
 20
20 - Req. quest
- Thordan's Reign
- Entrance
- Azys Lla (X:21.4, Y:22.5, Z:8.7)
- Location
- Singularity Reactor
- Region
- Abalathia's Spine
- S/S/S
- Available
- Patch
- 3.1
 The Echo
- On wipe: +5% (max +25%)
- Links
- EDB GT TC
With his typical flair for embellishment, the wandering minstrel has woven yet another stirring epic─this time from the threads of your Azys Lla confrontation with Archbishop Thordan VII. With the final verse yet ringing in the chambers of your mind, the memories of that titanic struggle arise once more with an almost surreal clarity...
— In-game description
The Minstrel's Ballad: Thordan's Reign is a level 60 trial introduced in patch 3.1 with Heavensward.
Strategy
 King Thordan and His Knights Twelve
Before the fight
- Clock spots should be assigned.
- Assign tanks to knights in Phase 3 (east/west)
- Assign DPS positions to go to for Skyward Leap (typically North → South → North)
-
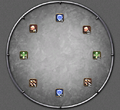 An example of clock spot positions.

Phase 1: Thordan - 100% - 70% or 80 seconds passed.
| Name | Description |
|---|---|
| Ascalon's Might | A cleave attack. |
| Heavenly Heel | A casted tankbuster. |
| Ancient Quaga | Unavoidable magic damage to all players. |
| Meteorain | Static circle AoEs placed under all players that deals moderate damage. |
| Lightning Storm | Marks every player with a purple spread circle arrow. |
| Ascalon's Mercy | Seven small cone AoEs split across a 180 degree radius. Deals moderate physical damage and knockback if not avoided. |
| The Dragon's Rage | A Stack marker on a random player. |
| The Dragon's Gaze | A gaze attack from Thordan. Inflicts |
| The Dragon's Eye | Adds a stack of |
Tank Thordan in the center facing away from the rest of the party. This first phase is simply an introduction to attacks Thordan himself will use again in the final phase, and are not complex nor difficult to handle.
Deal as much damage to Thordan during this phase as possible so that less time is spent in the final phase.
| Attack | Strategy |
|---|---|
| Ascalon's Might | Ensure Thordan is facing away from the party. |
| Meteorain | Dodge the AoEs. |
| Ascalon's Mercy | Players can stand between the cone AoEs to dodge. |
| Ascalon's Might | -- |
| The Dragon's Eye | Thordan will deal slightly more damage now. |
| The Dragon's Gaze | Look away from Thordan. |
| Ascalon's Might | -- |
| Lightning Storm | Spread out to avoid sharing damage. |
| The Dragon's Rage | Stack together to spread damage out. |
| Ancient Quaga | Heal the party. |
| Ascalon's Might | -- |
| Heavenly Heel | Mitigate and heal. |
| Ascalon's Might | -- |
| Phase 2 Start | |
Phase 2 - Knights of the Round
Thordan plants his sword at the edge of the arena and leaves, summoning his Knights of the Round to fight instead. The outer ring of the arena will now deal 9999 damage per tick to any player standing at the edge.
Phase 2a: Ser Charibert and Ser Hermenost
| Name | Description |
|---|---|
| Heavensflame | Attaches |
| Conviction | Four towers spawn in random locations at any of the eight cardinal directions. Unoccupied towers explode for high magic damage to the entire party and a lengthy, but cureable, |
Have the party stack in the middle of the arena. When the Heavensflames spawn (red circle AoEs), have the party spread out to their pre-assigned clock spot positions, breaking ![]() Burning Chains as they do so. Prioritize breaking chains first if necessary.
Burning Chains as they do so. Prioritize breaking chains first if necessary.
Four Conviction Towers will spawn at any of the eight cardinal directions. Avoid Heavensflames and stand in a tower. Be careful, as a Heavensflame may spawn at a tower location—if so, wait for the Heavensflame to explode before standing in the tower.
If each tower has at least one person standing in it, the mechanic is completed successfully, otherwise the party will be paralyzed.
Phase 2b: Ser Zephirin, Ignasse, Paulecrain, and Vellguine
| Name | Description |
|---|---|
| Sacred Cross | A 20 second cast that deals damage based on Ser Zephirin's remaining health. |
| Spiral Thrust | Three knights stand on the edge of the arena. After 6 seconds, they will charge in a straight line across the center dealing high damage and massive knockback to any players in their path. |
Ser Zephirin will spawn in the middle of the arena and start casting Sacred Cross. Players will need to bring Ser Zephirin's health to below 50% to survive the attack. This isn't a tight DPS check, so consider saving cooldowns for the next phase.
After Sacred Cross, the Spiral Thrust Knights, Sers Vellguine, Ignasse, and Paulecrain, will spawn outside the arena and prepare to charge down the center. This is easily dodged by standing at the center of each leaf-like decal that outlines the edge of the arena, where the stem would be.
Phase 2c: Ser Janlenoux and Ser Adelphel
| Name | Description |
|---|---|
| Divine Right | Grants one knight
|
| Holy Bladedance | A six-hit tankbuster. |
| Heavenly Slash | A powerful cleave. |
| Holiest of Holy | Unavoidable magic damage to the entire party. |
| Skyward Leap | Three players will be marked by blue circles one-after-another. The marked players are hit by heavy damage that deal proximity AoE damage to all other players. |
Two knights will spawn—Ser Adelphel on the west, and Ser Janlenoux on the east. They will cast Divine Right that buffs themselves with either ![]() Sword of the Heavens or
Sword of the Heavens or ![]() Shield of the Heavens. The two knights need to be tanked separately at the edges, or they will tether and share buffs.
Shield of the Heavens. The two knights need to be tanked separately at the edges, or they will tether and share buffs.
All DPS must attack the knight with ![]() Sword of the Heavens, as the other will be resistant to damage.
Sword of the Heavens, as the other will be resistant to damage.
Afterwards, both knights will prepare their first tankbuster: Holy Bladedance. The tank with the ![]() Sword of the Heavens knight will need heavy mitigations or an invincibility cooldown, while the tank with the
Sword of the Heavens knight will need heavy mitigations or an invincibility cooldown, while the tank with the ![]() Shield of the Heavens knight can use a lesser mitigation.
Shield of the Heavens knight can use a lesser mitigation.
After the first Holy Bladedance, three knights will appear in the center and begin casting Skyward Leap. Three DPS will be marked with a blue circle marker one-after-the-other with about two seconds in-between. The first DPS marked should move north and wait for the knight to land before rejoining the group. The second DPS marked moves south for this mechanic, while the third DPS marked moves north again.
During this time, the knights will cast a second Divine Right, swapping their buffs, and then perform Heavenly Slash on the tanks. If DPS is good, it is possible to defeat one knight before this Divine Right cast.
Holiest of Holy (party-wide AoE) follows after this, and then the second Holy Bladedance, so make sure the entire party and tanks are topped up in time.
The knights will continue to use Divine Right, Holy Bladedance, Heavenly Slash, and Holiest of Holy until defeated. Once one knight is defeated, the other will lose their Divine Right buff.
After both knights are defeated, gather the party in the center of the arena for the next phase.
Phase 2d: Ser Grinnaux and Ser Haumeric
| Name | Description |
|---|---|
| Dimensional Collapse | Places a black Static circle AoE underneath every player that will grow over time. Explodes after 6 seconds. |
| Hiemal Storm | Marks five players with ice spread circles. Explodes after 3 seconds, leaving ice puddles on the ground that inflict |
| Spiral Pierce | The three players not marked by Hiemal Storm are marked by spread line tethers, dealing moderate damage. |
| Faith Unmoving | An unmarked radial knockback originating from Ser Grinnaux. |
Stack at the center of the arena to ensure all Dimensional Collapse AoEs are in the same spot. Once the circles appear, players should spread to their clock spot positions. Three players will be tethered by Spiral Pierce, while the other five will be marked for Hiemal Storm. Avoid standing close to the players marked by Spiral Pierce.
After Spiral Pierce and Hiemal Storm, immediately move towards the center for Faith Unmoving. Players should orient themselves so that they are not knocked back into any of the frost puddles.
Healers should remove any ![]() Frostbite debuffs from afflicted party members.
Frostbite debuffs from afflicted party members.
Phase 2e: Ser Noudenet and Ser Guerrique
| Name | Description |
|---|---|
| Holy Meteor | Four random players are marked by spread circle arrows, and are hit by small AoEs four times in succession. |
| Heavy Impact | Ser Guerrique slams the ground, creating an expanding four-stage shockwave AoE in a ~270 degree cone. Deals high damage and inflicts |
Eight Comet Circles will spawn along the eight cardinal directions, and one Meteor Circle in the center. Players must destroy all Comet Circles first before the comets land and detonate. Once all Comet Circles are removed, all players must immediately focus on the Meteor Circle or else it will wipe the party. A Limit Break can be used if time is running out.
The party can survive one Comet Circle touching the floor, but not two. If DPS is struggling, assigning one comet circle to ignore is a possibility.
Some players will be marked for Holy Meteor in the meantime, which will do light damage in an area around them. As a result, avoid stacking two players together.
Ser Hermenost will appear in the center of the arena and perform Heavy Impact—concentric red rings that will damage and ![]() Stun any player hit by them. These should be avoided by either moving to the safe sector, or by crossing rings as the inner ring explodes.
Stun any player hit by them. These should be avoided by either moving to the safe sector, or by crossing rings as the inner ring explodes.
Phase 2f: Ultimate End
| Name | Description |
|---|---|
| The Light of Ascalon | Minor unavoidable party-wide damage and minor directional knockback away from Thordan. |
| Ultimate End | Major unavoidable party-wide damage. Damage is increased for every player death that occurred throughout Phase 2. |
After the Meteor Circle is destroyed, King Thordan will reappear.
Thordan will cast The Light of Ascalon seven times, summoning his Knights of the Round. This does minor knockback, so don't stand at the very edge of the arena.
Once all the knights are summoned, Thordan will cast Ultimate End. Healers should use shield and mitgations prior to lower the damage of this attack.
The fight will then entire its final phase.
Phase 3: Thordan and the Knights of the Round
Thordan will use all attacks from prior phases, along with a couple new ones and some changes to existing ones. Mini-phases will be split via casts of The Dragon's Eye.
| Name | Description |
|---|---|
| Knights of the Round | Thordan summons his knights, who will attack with a separate series of attacks alongside Thordan's own. |
| The Dragon's Eye | Now also places a giant Eye of Nidhogg in the background of the arena. Always starts on the north side, but subsequent casts will move it to a random location. |
| The Dragon's Gaze/Glory | A gaze attack originating from both Thordan and the Eye of Nidhogg simultaneously. |
| Holy Shield Bash | A random healer is marked. After a few seconds, they are inflicted with |
| Spear of the Fury | A wild charge attack aimed at the healer hit by Holy Shield Bash. Inflicts
|
Tank Thordan north, with the MT standing at 11 o'clock, and the party stacked together at 1 o'clock. Thordan will cast The Dragon's Eye, creating an image of Nidhogg's Eye outside the north side of the arena.
Phase 3a: Knights of the Round 1
Thordan will cast Knights of the Round, summoning Adelphel and Janlenoux, who will mark a healer for Holy Shield Bash. That player should move to the outer edge of the arena, while the rest of the party arranges themselves so the off-tank is closest to the center of the arena and the affected healer is on the outside.
Ser Zephirin will then spawn in the middle of the arena and begin casting Spear of Fury to kill the healer. The off-tank should stand between Zephirin and the healer and use heavy mitigations. The DPS and other healer must stand between the off-tank and the stunned healer. The main tank must avoid the stack due to the ![]() Infirmity it inflicts.
Infirmity it inflicts.
As Spear of Fury happens, Thordan will also Heavenly Heel the main tank. Healers must quickly top up the main tank, then have the whole party turn around to dodge the upcoming Dragon's Gaze/Glory.
Once ![]() Infirmity expires, heal up the party quickly in preparation for Ancient Quagga.
Infirmity expires, heal up the party quickly in preparation for Ancient Quagga.
| Attack | Strategy |
|---|---|
| The Dragon's Eye | The Eye of Nidhogg will be created at the north side of the arena. Tank Thordan north to simplify dodging the gaze attacks. |
| Knights of the Round | Adelphel and Janlenoux are summoned. |
| Ascalon's Might | -- |
| Holy Shield Bash | Have the marked healer run towards the edge to give the rest of the party space to stack inbetween. |
| Spear of Fury + Heavenly Heel | The rest of the party must protect the stunned healer while the main tank mitigates the tankbuster. |
| The Dragon's Gaze/Glory | All players must look away from both Thordan and the north side of the arena. |
| Ancient Quaga | Heal up the party. |
| Phase 3b Start | |
Phase 3b: Knights of the Round 2
Thordan casts Dragon's Eye, and the main tank will need to move Thordan to the eye's new location. Face Thordan towards the Eye.
Thordan will once again cast Knights of the Round. Sers Guerrique, Hermenost, and Ser Grinnaux will spawn and begin the next series of mechanics.
Four Conviction towers will spawn across the center of the arena, perpendicular to the two knights. Just like in Phase 2a, each tower needs at least one person standing in it to avoid party-wide damage and paralysis.
At the same time, Thordan will cast The Dragon's Gaze/Glory and Guerrique casts Heavy Impact in an attempt to move players off the towers. Players must both look away from Thordan and the eyes and at the same time dodge the AoEs while staying inside the towers. Heavy Impact will always split across the halfway point of the tower, so it's players can always dodge without leaving the tower itself.
The Dragon's Gaze check happens when the first Heavy Impact ring explodes, while the Conviction Tower check happens as the second Heavy Impact ring explodes.
To help spread players out, players may want to agree on a plan prior (e.g: melee take the inner two towers, ranged take the outer two, tanks and healers try to fill in).
After Conviction Towers, Grinnaux spawns Dimensional Collapse circles at each player's location. Thordan then prepares to cast Dragon's Rage, but Grinnaux will also be preparing a knockback, Faith Unmoving. Players should stack in the middle to both manage the stack marker and avoid hitting the edges.
Afterwards, have the main tank split away from the group to avoid cleaving anyone with Thordan's Ascalon's Might.
| Attack | Strategy |
|---|---|
| The Dragon's Eye | The Eye of Nidhogg will move to a random section of the arena. Move Thordan to the same side. |
| Knights of the Round | Sers Guerrique, Hermenost, and Ser Grinnaux are summoned. |
| Conviction + Heavy Impact + The Dragon's Gaze/Glory | Run into the towers while looking away from the gaze attacks. Dodge the second impact wave by dodging between the waves without leaving the tower. |
| Dimensional Collapse | Avoid the AoEs. |
| The Dragon's Rage + Faith Unmoving | Stack together in the center to be knocked back in the same direction. |
| Ascalon's Might | -- |
| Phase 3c Start | |
Phase 3c: Knights of the Round 3
Ignore The Dragon's Eye Thordan casts during this phase, as there is no Dragon's Gaze. He will then follow it up with his third Knights of the Round.
Thordan will cast Lightning Storm, and then Ser Vellguine, Ignasse, and Paulecrain will be summoned. After Lightning Storm hits, quickly heal up the party.
- Ser Ignasse marks a player (not the main tank) for Skyward Leap.
- Ser Paulecrain will remain at the center and tether to another player for Spiral Pierce.
- Ser Vellguine will be outside the arena preparing Spiral Thrust.
- Thordan will cast The Dragons Rage.
Thordan should be on the edge of the arena, out of the Spiral Thrust knight's path. The player marked for Skyward Leap should move opposite the party to reduce the damage the party takes from Skyward Leap, while the tethered player must avoid both the party and the Spiral Thrust knight, while ideally being away from the Skyward Leap player.
A simple way to position would be to have the main tank bring Thordan about 45 degrees from the Spiral Thrust knight. Then, the Skyward Leap player moves opposite, while the tethered player moves 90 degrees from the party in either direction.
After Dragon's Rage hits, heal the tank in preparation for Heavenly Heel and Ascalon's Might.
| Attack | Strategy |
|---|---|
| The Dragon's Eye | Can be ignored this phase, as there is no gaze attack. |
| Knights of the Round | Ser Vellguine, Ignasse, and Paulecrain is summoned. |
| Lightning Storm | Spread out |
| The Dragon's Rage + Spiral Knights | Unmarked players stack together out of the path of Spiral Thrust while the player with Spiral Pierce and Skyward Leap stay away from the stack. |
| Heavenly Heel | Mitigate and heal. |
| Ascalon's Might | -- |
| Phase 3d Start | |
Phase 3d: Knights of the Round 4
Thordan will cast The Dragon's Eye—move him to the eye's new location. All players (other than the main tank) should stack behind Thordan.
Shortly after, Knights of the Round is cast again and three knights, Ser Charibert, Ser Haumeric, and Ser Noudenet are summoned.
The party will be inflicted with ![]() Burning Chains. Spread out to clock spot positions relative to the main tank (treat the main tank as north). Once again, prioritize breaking
Burning Chains. Spread out to clock spot positions relative to the main tank (treat the main tank as north). Once again, prioritize breaking ![]() Burning Chains.
Burning Chains.
The party members will naturally avoid Dragon's Gaze as they spread out to break Holy Chains, other than the main tank who will need to move sideways to help break their chain.
As chains are getting broken, four players are marked by Hiemal Storm and four Holy Meteor, all while Thordan casts Ascalon's Mercy—dodge Ascalon's Mercy while spreading out and placing Hiemal Storm along the edges of the arena.
Quickly heal up the party to prepare for Ancient Quaga → Heavenly Heel → Ancient Quaga, bearing in mind that Thordan's damage is significantly stronger now because of accumulated ![]() Light of Ascalon stacks.
Light of Ascalon stacks.
| Attack | Strategy |
|---|---|
| The Dragon's Eye | Move Thordan to the eyes new location. |
| Knights of the Round | Ser Charibert, Ser Haumeric, and Ser Noudenet are summoned. |
| Ascalon's Might | -- |
| The Dragons Gaze/Glory + Heavensflame + Holy Meteor | Break |
| Ascalon's Mercy + Heimal Storm | Dodge the cone AoEs while staying spread out and placing Heimal Storms across the edges of the arena. |
| Ancient Quaga | Keep healing the party. |
| Heavenly Heel | Strong mitigations required. |
| Ancient Quaga | -- |
| Phase 3e Start | |
Phase 3e: Knights of the Round 5
At the final Knights of the Round, two to three knights will spawn at a time (starting with Adelphel and Janlenoux) and begin casting heavy raidwide damage, putting healers on high alert.
The last knight to appear is Ser Zephirin, who will begin to cast Sacred Cross again. This time, however, he will be tethered to Thordan, making him invulnerable until Sacred Cross is finished. Zephirin has significantly more health, so an DPS LB3 should be used on Zephirin if it was not already used on Thordan.
After Sacred Cross, prepare for Heavenly Heel → Ascalon's Might. Finally, Thordan will use Ascalon's Might several times in a row before slowly casting Ancient Quaga. This is Thordan's enrage, which will KO the entire party if the boss is not killed before the cast finishes.
| Attack | Strategy |
|---|---|
| The Dragon's Eye | Move Thordan towards the eye one last time. |
| Knights of the Round | Summons Adelphel and Janlenoux. |
| Ascalon's Might | -- |
| Holiest of Holy | Heal the party up quickly. |
| Heavensward Leap x3 | Focus on Ser Zephirin while keeping the party alive. |
| Sacred Cross | Use a Limit Break on Zephirin if extra damage is needed. |
| The Dragon's Gaze/Glory | Look away from Thordan and the eye. |
| Ancient Quaga | Massive amounts of heals required. |
| Heavenly Heel | Mitigations or invulnerabilities recommended. |
| Ascalon's Might x6 | Keep the party alive, as this is the last chance to defeat Thordan. |
| Enrage | |
Loot
- Each player will receive 1 Heavens' Ward Helm Fragment per kill. Collect 10 totems to exchange for a weapon or 99 for a Round Lanner Whistle at Bertana in Idyllshire (X:5.9, Y:5.2).
- 20 Allagan Tomestone of Poetics
- Archbishop Thordan VII Card (Drops at a fixed rate.)
 Treasure Coffer
| Name | Type | Item Level | Rarity | Quantity |
|---|---|---|---|---|
| Paladin's Heavens Arms (IL 205) | Other | 1 | Blue | 1 |
| Axe of the Heavens | Marauder's Arm | 205 | Blue | 1 |
| Claymore of the Heavens | Dark Knight's Arm | 205 | Blue | 1 |
| Gunblade of the Heavens | Gunbreaker's Arm | 205 | Blue | 1 |
| Halberd of the Heavens | Lancer's Arm | 205 | Blue | 1 |
| Sickle of the Heavens | Reaper's Arm | 205 | Blue | 1 |
| Knuckles of the Heavens | Pugilist's Arm | 205 | Blue | 1 |
| Katana of the Heavens | Samurai's Arm | 205 | Blue | 1 |
| Daggers of the Heavens | Rogue's Arm | 205 | Blue | 1 |
| Bow of the Heavens | Archer's Arm | 205 | Blue | 1 |
| Heavensfire | Machinist's Arm | 205 | Blue | 1 |
| War Quoits of the Heavens | Dancer's Arm | 205 | Blue | 1 |
| Staff of the Heavens | Two-handed Thaumaturge's Arm | 205 | Blue | 1 |
| Grimoire of the Heavens | Arcanist's Grimoire | 205 | Blue | 1 |
| Rapier of the Heavens | Red Mage's Arm | 205 | Blue | 1 |
| Cane of the Heavens | Two-handed Conjurer's Arm | 205 | Blue | 1 |
| Codex of the Heavens | Scholar's Arm | 205 | Blue | 1 |
| Heavensmeter | Astrologian's Arm | 205 | Blue | 1 |
| Milpreves of the Heavens | Sage's Arm | 205 | Blue | 1 |
| Heavens Weapon Coffer (IL 205) | Other | 1 | Basic | 1 |
| Round Lanner Whistle | Other | 1 | Basic | 1 |
| Faded Copy of Heroes | Other | 1 | Basic | 1 |
Achievements
This duty is associated with the following achievements:
| Name | Points | Task | Reward | Patch |
|---|---|---|---|---|
| The King and Die | 10 | Defeat King Thordan in the Minstrel's Ballad: Thordan's Reign. | 3.1 | |
| Mightier than the Round | 5 | Complete the Minstrel's Ballad: Thordan's Reign with a party of only blue mages, Silence Echo turned on, and Unrestricted Party turned off. | 5.15 |
Music
| Section | Theme |
|---|---|
| Earlier Phases | Heroes Never Die |
| Final Phase | Heroes |
Gallery
Weapon Images


Trial Images


Notes
- It is not possible to skip the lengthy adds phases even when running this trial unsynced, as Thordan's HP will lock to 0.1% in the first phase.
Historical
- The Katana of the Heavens and Rapier of the Heavens were added to the drop table in patch 4.0 to correspond with the release of the samurai and red mage jobs in Stormblood.
- The Gunblade of the Heavens, War Quoits of the Heavens, Sickle of the Heavens, and Milpreves of the Heavens were added to the drop table in patch 6.1. These are new weapon models for jobs added since patch 5.0. These models are used for Ultimate Weapons of the Heavens which were added in patch 6.11.