Containment Bay S1T7 (Extreme)
The North American, European, and Oceanian data centers primarily use Party Finder to challenge (Extreme) content. Using Duty Finder to match with random players is not recommended and will be more difficult than pre-forming a party. For an easy completion (that will satisfy any quest requirements) or loot farming, it is recommended that players use Party Finder and form an Unrestricted Party (i.e., with level sync disabled). Players who wish to complete this duty with level sync enabled should also form a pre-made party, which also enables the use of Minimum Item Level and Silence Echo settings for a more authentic challenge compared to a Duty Finder party.
Containment Bay S1T7 (Extreme)
.png)
- Level
- 60 (Sync: 60)
- Item Level
- 205
- Difficulty
- Extreme
- Party size
- Full Party
8 man • 2 2
2  4
4 
- Unsyncing
- Allowed
- Time limit
- 60 minutes
- Phoenix Down
- Not Available
- Duty Finder
- High-end Trials (Heavensward)
- Roulette
- Mentor
- Tomestones
 20
20 - Req. quest
 A Fiendish Likeness
- Entrance
- Azys Lla (X:25.4, Y:22.5, Z:8.4)
- Location
- Containment Bay S1T7
- Region
- Abalathia's Spine
- Stone, Sky, Sea
- Available
- Patch
- 3.2
 The Echo
- On wipe: +5% (max +25%)
Preserved upon the Allagan tomestone you received from Unukalhai was an extraordinary history─a detailed record of the battles fought between the eikon Sephirot and the armies of Allag. After feeding the account of this epic conflict into Azys Lla's verification systems, you have succeeded in activating what the node describes as a “combat simulation."
Can the enigmatic technology of the ancient empire truly manifest an enhanced simulacrum of the formidable Fiend? Can this artificial incarnation truly surpass the threat posed by the original Sephirot? There is but one way to know for certain...— In-game description
Containment Bay S1T7 (Extreme) is a level 60 trial introduced in patch 3.2 with Heavensward.
Strategy
 The Fiend: Sephirot
Sephirot has three phases and many attacks that can punish or wipe the entire group for one person failing a mechanic. Proper group coordination is key to success.
Phase 1: 100% - 65%
While in this phase, the arena edges are safe— players can not fall to their death here.
The group should decide whether the player targeted by the purple Ratzon should stay near the center or run to the edge.
| Name | Description |
|---|---|
| Triple Trial | A frontal cleave tank-buster. Cast frequently — ensure Sephirot is facing away from the rest of the party. |
| Tifferet | Party-wide damage that must be healed through, as it can be used in rapid succession. |
| Ein Sof | Sets of green circles that grow in size over time. Standing in these circles will gradually deal damage and inflict |
| Fiendish Rage | A healer and a DPS will be marked with stack markers. Sephirot will leap to them one at a time, dealing damage and inflicting a
|
| Chesed | Hard-hitting tankbuster with no cast bar, only indicated by Sephirot slowly raising his arm. Always followed by Triple Trial. |
| Ain | Sephirot will spawn one single Ein Sof circle. Six seconds later, he will face a random party member and prepare a 180 degree cleave. This is always combined with Ratzon. |
| Ratzon | One party member is targeted with a giant purple circle AoE while six are targeted with smaller green AoEs. The party must spread out carefully while remaining behind Sephirot. |
Sephirot should be tanked in the center as much as possible, only moving away when half the arena becomes covered with Ein Sof.
| Group | Attack | Strategy |
|---|---|---|
| Opening | Triple Trial | Tank the boss in the center and away from the raid. Ensure everyone stays healthy. |
| Tifferet | ||
| Tifferet | ||
| Triple Trial | ||
| Loop | Ein Sof | Move to whichever half of the arena is safe from the growing bubbles. Sephirot will not cleave during this and can safely be moved through the group. |
| Tifferet | ||
| Fiendish Rage | Split the two stacks to opposite sides of the boss— players will die if they are hit by both stacks. The main tank should avoid the stacks completely. | |
| Tifferet | Bring Sephirot back to the center of the arena. | |
| Tifferet | ||
| Chesed | Prepare to heal the main tank through this large burst of damage. | |
| Triple Trial | ||
| Ein Sof | All players should stand between Sephirot and the Ein Sof bubble to ensure Ain is faced away from the safe half of the arena. | |
| Tifferet | ||
| Ain & Ratzon | The player marked with the purple AoE should stay on Sephirot's back while the rest run to the edge, or the purple AoE can run to the edge while the rest go to the center. | |
| Tifferet | ||
| Tifferet | ||
| Chesed | Prepare to heal the main tank through this large burst of damage. | |
| Triple Trial | ||
| Loop Repeat | ||
-
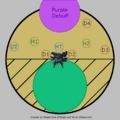 Ain+Markers/Circles Example

Phase 2: Adds
Sephirot becomes untargetable and begins charging a limit break. The party must kill two Cochma and four sets of 3 Binah before Sephirot finishes charging.
When any enemy is killed, they will explode with Genesis, dealing unavoidable party-wide damage depending on which type died. Genesis deals ![]() Unique damage, not magic damage.
Unique damage, not magic damage.
| Enemy | Attacks | Description |
|---|---|---|
| Cochma | Empty Hand | A physical damage attack that applies a stack of |
| Genesis | Cast on death. Deals ~6000 | |
| Binah | Solid Stone | A hard-hitting magic attack cast simultaneously by the group on their main enmity target. |
| Genesis | Cast on death. Deals ~2000 |
As Cochma deals nothing but physical damage, one tank should only tank Cochma while the other tank handles the Binah. The ![]() Magic Vulnerability Up causes magic attacks to deal additional damage proportional to max health. Even one stack could cause a single round of Solid Stone to result in a tank's death.
Magic Vulnerability Up causes magic attacks to deal additional damage proportional to max health. Even one stack could cause a single round of Solid Stone to result in a tank's death.
Once the first Cochma is killed, the second one will spawn shortly after. Binah however will spawn on a timer. If players take too long to kill all living enemies, additional groups of Binah will spawn periodically.
Once all enemies are dead, Sephirot will grow massive and cast Ein Sof Ohr— dealing massive unavoidable damage to the entire party.
Phase 3: 65% - 0%
Sephirot grows giant and stands off the platform. The walls are removed and the arena can now be fallen off of, which will result in player deaths.
| Name | Description |
|---|---|
| Yesod | The ground will flash yellow. A few seconds later — giant stalagmites will pierce where players were standing during the flash, dealing damage and inflicting a |
| Force Field | Four party members receive |
| Gevurah & Chesed | Sephirot will damage half the arena with a green sphere (magic) and half with an orange sphere (physical). |
| Fiendish Wail | Two towers will appear, one in the east and one in the west. Sephirot will slam these towers for physical damage. If the tower is empty, the entire party will take massive damage and gain a stack of |
| Da'at (Tethered) | Sephirot will create five Ein Sof circles and attach four interceptable tethers to the people with |
| Da'at | When no debuffs are present, this simply deals heavy AoE damage to random party members— starting with a tankbuster on the main tank. |
| Earth Shaker | A healer and a DPS will get a marker above their heads as well as a proximity tether. After a few seconds, Sephirot will fire a Line AoE at the tethered players, dealing damage to them and any players inbetween.
|
| Pillar of Mercy | Sephirot slams the platform on the north, west, and then east side. Impact points are marked by a blue circle, which will knock all players away and cannot be resisted. Standing inside the impact point will deal high damage. |
| Malkuth | Sephirot will lower his head and inflict a strong knockback from his face. Knockback is resistable. Spawns a Storm of Words and four Binah afterwards. |
| Storm of Words | An enemy that spawns on the south side of the platform. Starts slowly casting Revelation which, if finished, will knock all players off the platform. Must be killed as fast as possible. |
| Pillar of Severity | Used at the very end of the rotation— Sephirot drops their arms on the west side of the platform and attempts to sweep the entire party off. If Storm of Words was killed in time, its corpse will create a safe zone. |
A large amount of attacks in this phase will kill most or all the party if one player messed up a mechanic. Players must ensure they know their role, their debuff, and the strategy or else risk potentially taking down other party members with them.
Tanks should assign themselves to east or west towers for when debuffs expire.
| Attack | Strategy |
|---|---|
| Yesod | Stack prior. When the ground flashes yellow/green run away from where you and other players were standing prior. |
| Force Field | Check whether you have |
| Gevurah & Chesed | Match your buff to the color of the orbs. |
| Fiendish Wail | Should only be stood in by |
| Ein Sof & Da'at (Tethered) | All |
| Fiendish Wail | |
| Gevurah & Chesed | As before, match your debuffs with the orb colors. Debuffs will expire after this attack. |
| Earthshaker & Yesod | While the two tethered players split to opposite sides and run away from Sephirot, the rest of the party should stack in front of Sephirot waiting for the Yesod flash, then move south to safety. |
| Da'at | Split apart to minimize AoE damage. The main tank may want to use a mitigation. |
| Fiendish Wail | As there are no more debuffs, only tanks should take these towers. |
| Gevurah & Chesed | As damage type doesn't matter, all players should stack directly under Sephirot in preparation for Yesod afterwards. |
| Pillar of Mercy & Yesod & Ein Sof | Stack the Yesod on top of the blue circle, then move out of the blue circle and aim to be knocked south-east away from the Ein Sof bubbles.
Run towards the west impact point to avoid falling off the platform, then for the last knockback, aim towards the larger Ein Sof bubble— as it will expire right before the knockback. |
| Earth Shaker | Handle as normal. |
| Da'at & Yesod | As these happen near simultaneously, players will need to split prior and be ready to run somewhere another player wasn't standing once Yesod flashes. |
| Fiendish Wail | Tanks should stand in their assigned towers. |
| Gevurah & Chesed | Stack in front of Sephirot in preparation for Malkuth. |
| Malkuth | Stand as close to Sephirot as possible to avoid being knocked off the platform.
DPS should be prepared to start attacking the Storm of Words. Tanks should be ready to tank the two Binah that spawn closest to their assigned tower locations. |
| Gevurah & Chesed | Simply a healing check. |
| Fiendish Wail + Yesod | Tanks should be tanking their Binah on their assigned tower location. Mitigations should be used here. Tanks should wait until the towers resolve before running to dodge Yesod. |
| Gevurah & Chesed | |
| Yesod | If the Storm of Words is still alive, players will need to move away from it temporarily to dodge this. |
| Gevurah & Chesed | |
| Pillar of Severity | A stack marker should appear on the Storm of Words corpse. All players must stand on it to be launched above Sephirot's clothesline attack. |
| Loop Repeat | |
The enrage will be indicated by an unavoidable Pillar of Severity.
-
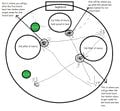 Pillar+Yesod+Ein Sof Example
 -
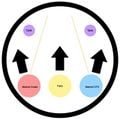 Earth Shaker+Yesod Positioning


Loot
- Each player will receive 1
 Fiend Totem per kill. Collect 10 totems to exchange for a weapon or 99 for a
  Warring Lanner Whistle at Bertana in Idyllshire (X:5.9 Y:5.2).
 - 20 Allagan Tomestone of Poetics
 Sephirot Card (Drops at a fixed rate)
 Sephirot Sap Drops directly from boss, must be synced
 Treasure Coffer
| Name | Type | Item Level | Rarity | Quantity |
|---|---|---|---|---|
| Other | N/A | Blue | 1 | |
| Marauder's Arm | 220 | Blue | 1 | |
| Dark Knight's Arm | 220 | Blue | 1 | |
| Lancer's Arm | 220 | Blue | 1 | |
| Pugilist's Arm | 220 | Blue | 1 | |
| Samurai's Arm | 220 | Blue | 1 | |
| Rogue's Arm | 220 | Blue | 1 | |
| Archer's Arm | 220 | Blue | 1 | |
| Machinist's Arm | 220 | Blue | 1 | |
| Two-handed Thaumaturge's Arm | 220 | Blue | 1 | |
| Arcanist's Grimoire | 220 | Blue | 1 | |
| Red Mage's Arm | 220 | Blue | 1 | |
| Two-handed Conjurer's Arm | 220 | Blue | 1 | |
| Scholar's Arm | 220 | Blue | 1 | |
| Astrologian's Arm | 220 | Blue | 1 | |
| Shield | 220 | Blue | 1 | |
| Material | N/A | Basic | 1 | |
| Other | N/A | Basic | 1 | |
| Other | N/A | Basic | 1 | |
| Other | N/A | Basic | 1 |
Achievements
This duty is associated with the following achievements:
| Name | Points | Task | Reward | Patch |
|---|---|---|---|---|
| 10 | Defeat Sephirot in Containment Bay S1T7 (Extreme). | - | 3.2 | |
| 5 | Complete Containment Bay S1T7 (Extreme) with a party of only blue mages, Silence Echo turned on, and Unrestricted Party turned off. | - | 5.15 |
Music
| Section | Theme |
|---|---|
| Phase 1 | |
| Phase 2 |
Images


Dialogue
Sephirot: Pestilent northerners...
You shall regret the decision to loosen my fetters!
Sephirot: The equilibrium of life...
I shall tip thy scales and partake of thy bounteous energy!
Sephirot: Patience and penance...
For millenia have I yearned to enact this vengeance!
Sephirot: I am the end and the beginning!
By my touch shall your wretched lives me blessed!
Sephirot: You have dimmed my boundless light.
What power of death do you mortals wield...?
Sephirot: I am the incarnation of life!
I cannot perish...cannot wither...