Abyssos: The Eighth Circle (Savage)
Abyssos: The Eighth Circle (Savage)
.png)
- Level
- 90 (Sync: 90)
- Item Level
- 610
- Difficulty
- Savage
- Party size
- Full Party
8 man • 2 2
2  4
4 
- Unsyncing
- Allowed
- Time limit
- 120 minutes
- Phoenix Down
- Not Available
- Duty Finder
- Savage Raids (Endwalker)
- Tomestones
 15
15 - Req. quest
- Talk to Nemjiji after completing Truth Imperfect
- Location
- Stygian Insenescence Cells
- Region
- The World Unsundered
- S/S/S
- Available
- Patch
- 6.2
 The Echo
- Permanent +20%
- Links
- EDB GT TC
As your journey into the depths of Pandæmonium concludes, you are left with nearly more questions than answers. Professor Claudien has disappeared, and Pandæmonium has drifted into the modern age upon the currents of the aetherial sea. Even so, the glint in Nemjiji's eyes shines brighter than ever, and she seems more than eager to provide her own answers as she hears your story. Whether those will give rise to ever more questions, however, remains to be seen...
— In-game description
Abyssos: The Eighth Circle (Savage) is a level 90 raid introduced in patch 6.2 with Endwalker. The raid is also known as P8S. Completing this duty, which can be done with an Unrestricted Party (unsynced), is needed to unlock The Omega Protocol (Ultimate).
Phases & Abilities
 Perfect Imperfection: Hephaistos
Players should note that the arena is surrounded by a border of fire, and touching it will instantly kill them. Before the fight, players should establish spread positions, partners (tanks and healers with a DPS each), as well as spread positions in corners for each partner, light parties consisting of a tank, healer and a DPS, and assign them directions to move for mechanics (light party one move to the north/west and group two moves to the south/east). This direction will also apply when light parties handle the Gorgon ads that spawn during the fight.
Phase 1
Abilities
- Genesis of Flame: Unavoidable roomwide AoE that inflicts high damage, requiring mitigation.
- (Conceptual) Flare: Depending on the name of the ability, the boss will store an attack that will later resolve in combination with other mechanics. This will be represented by the
 Conceptual Mastery buff.
- Conceptual Diflare: Both healers will later be hit with an untelegraphed split damage AoE that should be shared between four players each.
- Conceptual Tetraflare: Either all DPS or all tanks and healers will later be hit with an untelegraphed split damage AoE that should be shared between two players each.
- Conceptual Octaflare: All players will later be hit with an untelegraphed AoE that requires the party to be fully spread out.
- Attacks without Conceptual will resolve immediately when the castbar finishes (only applicable to Tetraflare and Octaflare).
- These attacks will inflict
 Magic Vulnerability Up to anyone hit, making overlapping AoEs lethal.
- Volcanic Torches: The boss summons multiple blue flames on each of the four walls that move along the marked lines of the floor. These flames will trace out a path, each covering off one quarter of the arena, closing off the lines and turning that part of the floor into an AoE that deals massive damage, killing any player caught in it (Torch Flame). Later, the attack will be used without a cast bar, in combination with other mechanics..
- Sunforge: The boss summons either a serpent familiar, creating a line AoE through the center third of the arena, or a phoenix familiar, creating line AoEs on the outer two thirds of the arena. The dark lines on the arena floor indicate the range of the attack.
- Flameviper: High damage line AoE tankbuster. The highest enmity player will be inflicted with Magic Vulnerability Up and
 Bleeding. The attack will repeat, requiring a tank swap. This attack can not be mitigated with an invulnerability skill, as the stacking debuffs from both hits will kill a tank instantly when the invulnerability wears off.
 - Reforged Reflection: The boss will either transform into a centaur or grow snakes from its arms. The initial transformation comes with an avoidable attack.
Centaur
- Footprint (no castbar): Upon transforming, the boss will use an untelegraphed knockback from the center that deals light damage and can be prevented with knockback immune abilities.
- Rearing Rampage: The boss uses four successive roomwide AoEs, each dealing moderate damage and targeting two random players with Uplift, a medium-sized circular AoE that inflicts moderate damage and
 Earth Resistance Down.
 - Stomp Dead: The boss jumps to the furthest player from its current location, dealing heavy damage in a medium-sized AoE that must be split between two players and inflicting
 Physical Vulnerability Up. Any players with Earth Resistance Down or Physical Vulnerability Up that are hit by this attack will instantly die. Failing to soak the attack with a partner and surviving will inflict
  Sustained Damage, dealing heavy damage over time. This attack will be used four times in succession.
 - Quadrupedal Impact: The boss will turn to a random cardinal and jump in that direction, dealing light damage and a heavy knockback from its new location, requiring players to go towards it. The knockback cannot be prevented with knockback immune abilities.
- Quadrupedal Crush: The boss will turn to a random cardinal and jump in that direction, causing a massive circular AoE to resolve in its new location.
- Trailblaze (no castbar): The boss will charge through the middle of the arena, instantly killing anyone in his path. The width of the lethal charge is indicated by the dark lines on the floor. Players to the sides will be knocked back a moderate distance. The knockback cannot be prevented with knockback immune abilities.
- Blazing Footfalls: The boss will telegraph four successive attacks, in the order of Trailblaze > Quadrupedal Impact > Trailblaze > Quadrupedal Crush, or Trailblaze > Quadrupedal Crush > Trailblaze > Quadrupedal Impact.
- Volcanic Torches (no castbar): The blue flames will trace out a path that will leave only one edge of the room safe.
Snake
- Snaking Kick (no castbar): Upon transforming, the boss will use an untelegraphed circular AoE that strikes the entirety of his hitbox dealing lethal damage, making the outside safe.
- Gorgomanteia (first usage): Will assign various debuffs to each player. All DPS or all tanks and healers will receive
 First in Line, while the other role group will receive
  Second in Line, indicating the timer of their second debuff. Within each role group, two players will receive
  Eye of the Gorgon and the other two players will receive
  Blood of the Gorgon, which will each resolve when the timer expires. Eye of the Gorgon will cause the affected player to shoot a small conal AoE in front of them, inflicting
  Petrification to any players or Gorgons hit and preventing them from moving or executing actions. Blood of the Gorgon will cause the afflicted player to be hit with a medium-sized circle AoE, inflcting high damage, Magic Vulnerability Up, and instantly killing any petrified players or Gorgons.
 - Into the Shadows (first usage): The boss calls upon two groups of two Gorgons, who will move about underground with a gaze indicator over their heads. Gorgons may spawn 90 or 180 degrees from each other. If they move clockwise, they will end up on cardinal positions, and if they move counterclockwise, they will end up on intercardinal positions. The second set of Gorgons will always end up in the unused cardinal or intercardinal positions from the first set. The Gorgons will circle around underground before popping up and will use Petrification after a short delay. Any player facing these Gorgons will be debuffed with Petrification and
 Damage Down. Players who are petrified and take damage will instantly die. The Gorgons will then be targetable and begin casting Gorgoneion, which will deal massive damage, killing anyone with Magic Vulnerability Up, and inflict Damage Down on everyone.
 - Ektothermos: Unavoidable roomwide AoE that inflicts high damage, requiring mitigation.
- Gorgomanteia (second usage): Will assign various debuffs to each player. All players will receive both Eye of the Gorgon and Blood of the Gorgon, with different timers depending on role groups. In addition, two random DPS or supports will receive
 Crown of the Gorgon, while two random players in the other role group will receive
  Breath of the Gorgon. Crown of the Gorgon is an omnidirectional petrifying attack from the afflicted player that requires other players to hide behind a petrified Gorgon to avoid the attack. Breath of the Gorgon is a high-damage split damage AoE that should be shared between four players and will instantly kill any petrified Gorgons or players.
 - Into the Shadows (second usage): The boss calls upon four Gorgons, who will move about underground with a gaze indicator over their heads. The adds will always spawn 90 degrees from each other and will end up on all cardinals or all intercardinals, based on if they move clockwise or counterclockwise. They will circle around underground before popping up and will Petrification after a short delay. The Gorgons will then be targetable and begin casting Gorgoneion, which has the same effect as before. The boss also summons four Illusory Hephaistos at each corner of the arena, who will cast Gorgospit, a line AoE inflicting lethal damage, along the edges of the arena, leaving only the center four tiles safe.
- Illusory Creation: The boss will summon one Illusory Hephaistos at a random wall, which will use Gorgospit, instantly killing any Gorgons in its path.
- Illusory Creation: The boss will summon four Illusory Hephaistos at each wall of the arena.
- Creation on Command: Two of the Illusory Hephaistos will use Sunforge, with one summoning a serpent and the other summoning a phoenix, leaving either the north and south squares or the east and west squares of of the room safe. Later, two of the adds will use Sunforge again, with both adds either summoning a serpent or phoenix, leaving the four corner squares or the middle square safe, respectively.
- Manifold Flames: Will target either all DPS or all tanks and healers with a medium-sized, untelegraphed AoE that inflicts Magic Vulnerability Up. The boss targets either the tanks and healers or the DPS, and hit each with a flare attack. The boss will then a second untelegraphed attack at the closest four players with a line AoE (Nest of Flamevipers) that inflicts high damage and Magic Vulnerability Up, instantly killing anyone already affected with this debuff.
- Nest of Flamevipers: The boss targets all players with a line AoE that inflicts high damage and Magic Vulnerability Up.
- Tetraflare: The boss uses a stack AoE directed at all tanks and healers or all DPS.
- Fourfold Fires: The boss drops a proximity marker (Abyssal Fires) in each corner of the room, which players must mitigate by moving to the center of the arena. The combined damage is still heavy and requires mitigation. These markers will turn into puddles.
- Cthonic Vent: Two puddles will begin bubbling, telegraphing a massive circular AoE centered on them that takes up roughly a quarter of the arena each. Upon the AoEs resolving, large fire serpents will leap out of them and move to two other random puddles that will erupt. This sequence will repeat one more time for a total of three sets of eruptions.
Strategy
The boss starts with a Genesis of Flame cast, so tanks and healers should mitigate to ease damage taken. The boss will then cast either Conceptual Tetraflare or Conceptual Octaflare and stockpile the attack for later. If the boss casts Octaflare, all players will receive an AoE underneath them, requiring them to spread out. If the boss casts Tetraflare, the boss will target four players, either all the tanks and healers, or all the DPS, and their partner must stack with them to mitigate the damage. After this the boss will cast Volcanic Torches, summoning blue flares that will draw lines across the arena. When the lines close, those sections of the floor will kill a player. Players should move to their spread corners and look to see where the flames draw lines. If the outer walls have a line drawn on them, players will need to move inward to avoid the attack, and vice versa. The boss will then cast Sunforge, summoning either a serpent or phoenix familiar. The serpent will fire a line AoE through the center of the arena, while the phoenix will fire two line AoEs through the outer thirds of the arena. This and the flares the boss cast earlier will resolve at the same time, so players need to determine the safe zone from Sunforge, then either stack up or spread out within it.
Immediately following this, the boss will cast Flameviper, a tankbuster. The tanks will need to pass enmity back and forth for each hit, as the ![]() Bleeding and
Bleeding and ![]() Magic Vulnerability Up will kill a tank, and the auto-attacks from the boss will kill as well. The main tank will take the first hit, then the off tank should Provoke, then after the second hit, the
Magic Vulnerability Up will kill a tank, and the auto-attacks from the boss will kill as well. The main tank will take the first hit, then the off tank should Provoke, then after the second hit, the ![]() Magic Vulnerability Up should fade, and the main tank can Provoke to get enmity once again. The boss will then cast Reforged Reflection and take on one of two forms at random; Snake or Centaur.
Magic Vulnerability Up should fade, and the main tank can Provoke to get enmity once again. The boss will then cast Reforged Reflection and take on one of two forms at random; Snake or Centaur.
If the boss becomes a Centaur, it will land on the arena and deal high damage and a knockback, which players will need to avoid with a knockback mitigation skill in order to not be sent into the wall, or stack under the boss. The boss will then use Rearing Rampage, stomping the ground dealing damage to all players, and hitting two players with Uplift, giving them an ![]() Earth Resistance Down II debuff. To handle this first mechanic, players should enter their clock positions to avoid overlapping. They should also remember the order in which they were given their debuff for the next attack. After each player has been hit, the boss will use Stomp Dead, an attack that is baited by a player that is the furthest away and must be mitigated by two players. If a player with the
Earth Resistance Down II debuff. To handle this first mechanic, players should enter their clock positions to avoid overlapping. They should also remember the order in which they were given their debuff for the next attack. After each player has been hit, the boss will use Stomp Dead, an attack that is baited by a player that is the furthest away and must be mitigated by two players. If a player with the ![]() Earth Resistance Down II debuff is hit by this, they will die. To handle this, the first players to be debuffed in the previous attack should move away from the boss, while the second hit should move under the boss, with the other players moving near to the boss, in line with the first group that was hit. It is recommended to use waymarkers for this, so players have a precise location to move to. The boss will leap to the players hit by the first debuff, attacking in a small AoE, then leap to the second hit players, who are now the furthest away. Meanwhile, the players who were hit third will swap places with the first group, and when the boss leaps to them, the fourth hit will swap places with the second group. Following this, the boss will return to normal.
Earth Resistance Down II debuff is hit by this, they will die. To handle this, the first players to be debuffed in the previous attack should move away from the boss, while the second hit should move under the boss, with the other players moving near to the boss, in line with the first group that was hit. It is recommended to use waymarkers for this, so players have a precise location to move to. The boss will leap to the players hit by the first debuff, attacking in a small AoE, then leap to the second hit players, who are now the furthest away. Meanwhile, the players who were hit third will swap places with the first group, and when the boss leaps to them, the fourth hit will swap places with the second group. Following this, the boss will return to normal.
If the boss grows Snakes, the boss will fire an AoE that fills its hitbox, so players need to move to at least max melee range to avoid. Players should then move into the center of the arena to prepare to take Gorgomanteia, which will inflict several debuffs. All players will be inflicted with either ![]() First in Line, indicating that the effect of their second debuff will fire first, or
First in Line, indicating that the effect of their second debuff will fire first, or ![]() Second in Line, indicating that their second debuff will fire second, as well as either
Second in Line, indicating that their second debuff will fire second, as well as either ![]() Eye of the Gorgon, indicated by the orange cone debuff, or
Eye of the Gorgon, indicated by the orange cone debuff, or ![]() Blood of the Gorgon, indicated by the green snake debuff. Players with the Eye debuff will fire a conal AoE that petrifies anything it touches, including players, while those with the Blood debuff will fire a point blank AoE that drops a poison puddle underneath them. Players will need to look at thier debuffs to determine if their light parties have both a First in Line for the Eye and Blood debuffs, and a Second in Line for both debuffs. If two players in a light party both have the same debuff that will fire on the same timer, the groups will need to swap players to ensure that each group is covered so both players have an Eye debuff firing first, and a Blood debuff firing second. Once parties have been sorted and any swaps have ocurred, players will look to their designated points to identify where their ads will spawn.
Blood of the Gorgon, indicated by the green snake debuff. Players with the Eye debuff will fire a conal AoE that petrifies anything it touches, including players, while those with the Blood debuff will fire a point blank AoE that drops a poison puddle underneath them. Players will need to look at thier debuffs to determine if their light parties have both a First in Line for the Eye and Blood debuffs, and a Second in Line for both debuffs. If two players in a light party both have the same debuff that will fire on the same timer, the groups will need to swap players to ensure that each group is covered so both players have an Eye debuff firing first, and a Blood debuff firing second. Once parties have been sorted and any swaps have ocurred, players will look to their designated points to identify where their ads will spawn.
The boss will cast Into the Shadows and summon two sets of two Gorgon ads that will tunnel underground for a bit before popping up and immediately firing Petrification at any player looking in their direction. If the ads tunnel around the arena in a clockwise direction, they will always pop out at the intercardinals of the arena, so players should look to the cardinals to avoid their attack. If they tunnel in a counter clockwise direction, they will pop out at the cardinals, and players will need to look to the intercardinals to avoid the attack. Once the ads appear, the First in Line players with Eye of the Gorgon will gaze their respective ads, then the Blood of the Gorgon players will step onto the ads and drop their puddle, killing them instantly. The second set of ads is handled the same way. Players should note that dropping a puddle on an ad that hasn't been petrified will explode and wipe the raid. If an ad is not defeated, it will fire an attack that deals high radiwide damage and inflicts a heavy ![]() Damage Down debuff on all players. Players should move to the center of the arena to mitigate and heal through the coming Ektothermos, then the boss will return to normal.
Damage Down debuff on all players. Players should move to the center of the arena to mitigate and heal through the coming Ektothermos, then the boss will return to normal.
The boss will transform into one of these forms at random, then once done its attacks, return to center and transform back. The boss will then use Illusory Creation, summoning four clones to the outside cardinals of the arena. Following this, the boss will use Creation on Command, and two of the ads perpendicular to each other will use Sunforge, summoning both a serpent and a phoenix. The boss will also cast Manifold Flames, attacking all of the tanks and healers or all of the DPS with a flare AoE, then will fire an untelegraphed line AoE at the other player role not hit. To handle these attacks, players should first find the phoenix and stay within its column, as its attack will fire on the outer two thirds of the arena from it. Players will then join their light parties and spread to their corners in the closest and furthest tiles from the phoenix, leaving room for the serpent to pass through. Whichever role does not get hit by Manifold Flames should then move in to the boss' hitbox at the intercardinals of the tile it is standing on, while the other players stack on the cardinals between them. This is to ensure the beams fire at the correct players without clipping the players who took the first hit. The Sunforge familiar attacks will resolve at the same time as the first Manifold Flames hit, then players will be free to move around to position correctly. Immediately following this, the other two clones will also use Sunforged, and summon either two serpents or two phoenixes. If two phoenixes are summoned, the center tile will be the only safe area, and if two serpents are summoned, players will be safe in the corners of the arena. the boss will also cast either Nest of Flamevipers, a line AoE that is fired from the boss at each player, or Tetraflare, requiring players to stack in pairs to mitigate.
Once these attacks resolve, the boss will summon more Volcanic Torches to the arena, however these torches will only leave one space available as a safe zone. To handle this, players should observe the southwest corner of the arena. If the flames reach that corner and move towards the southeast corner, players should move to the northwest. If they reach the southwest corner and move towards the northwest corner, players should move to the southeast. If they reach the corner but move away from the southeast, that is the safe corner, and finally if they move through the southwest corner, players should move to the northeast. Following this the boss will cast Genesis of Flame, so be prepared to mitigate and heal. Following this, whichever form the boss previously took, the boss will take its second form.
Following those mechanics and the boss returning to normal, it will begin to cast either a Conceptual Octaflare or Conceptual Tetraflare. The boss will then cast Fourfold Fires, dropping four proximity markers on each corner, so players need to move to the center to mitigate and heal through the damage. Players should then get into their light parties and be ready to face their designated area, either north or south, and observe the puddles. The boss will then cast Cthonic Vent, and two of the puddles will begin to bubble. The two that are bubbling are about to erupt in massive AoEs, so players should be facing their direction and be ready to call out which puddles are about to erupt. Players will then move to the safe zones. Once the serpents leap out of the bubbling puddles and into two new puddles, players can move to avoid the next AoE. The boss will then cast either Octaflare or Tetraflare, so players must move to mitigate the damage. The serpents will leap into a third puddles, and players must move accordingly. At this time the ability the boss stockpiled will fire, and players will have to handle the mechanics of the attack. The boss will also cast Sunforged again, so players must observe what familiar is summoned and evade appropriately. The boss will follow up with Flameviper again.
Following this, the boss will cast Reforged Reflection again, and whichever form the boss took first, it will take again. For the Centaur, the boss will cast either Quadrupedal Impact, which has the boss jumping to one of the cardinals and performing a massive knockback that can not be mitigated, or Quadrupedal Crush, which has the boss leaping to a cardinal and instead firing a massive AoE. Players need to observe which attack is coming and either move towards the boss or away. The boss will then cast Conceptual Diflare, requiring players to stack in their light parties, or Conceptual Tetraflare, which will have players stacking with their partners. The boss will then cast Blazing Footfalls, which will knock players back, then leap to another cardinal that will perform either a massive AoE or a knockback, then another dash across the arena that also deals a knockback, finally ending with another leap that will deal the opposite type of attack from the second hit. The first hit of the attack will coincide with the Flare attack the boss stockpiled, so players should be pre positioned for that. Then they need to either move towards or away from where the boss is leaping, prepare for another knockback, and finally handle the last hit of the attack. At the third hit, the boss will also summon Volcanic Torches, so players need to observe where the safe zone will be and prepare to move there. After this the boss will return to normal.
If the boss grows Snakes, players should move out of the boss' hitbox for its first attack, then move in for another Gorgomanteia. There are two new debuffs that players can now receive, ![]() Breath of the Gorgon, indicated by the purple snake debuff which will drop a poison puddle that deals split damage to everyone hit, and
Breath of the Gorgon, indicated by the purple snake debuff which will drop a poison puddle that deals split damage to everyone hit, and ![]() Crown of the Gorgon, indicated by the orange circle debuff, which will fire an omnidirectional Petrification AoE. This time around the debuff timers will have all the gaze attacks firing at once, then the puddles dropping at the same time. Players should position around the boss, then the boss will cast Into the Shadows calling all four ads at once. Players should watch which direction they move in to determine where they will come out of the ground as last time. The boss will also summon four clones at the edges of the arena, who will all fire Gorgospit in a line AoE around the outer edge of the arena. Players need to simply avoid the edge of the arena at this point. Once the adds appear, the gaze players should turn towards their ads and petrify them while the Blood debuffed players will drop their debuff away from the ads. The boss will cast Illusory Creation, then the second set of gaze players will petrify the ads again, with the second set of puddles being dropped away from the ads. A clone will appear on the edge of the arena in line with two of the ads, and prepare to fire Gorgospit in a straight line. Players should move to center for healing and swapping players to ensure each group has both a Crown and Breath debuffed player. Once this has been determined, players will split into their light parties and move towards the ads not in line with the clone based on which direction their group is assigned, and the player with the Crown debuff will stand on one side of the ad while the other players use the ad to break that player's line of sight. The Crown player will re-petrify the ad again, and the Breath debuffed player will drop their puddle, killing the ad. Meanwhile the clone will fire its attack and take care of the other two ads. The boss will return to normal.
Crown of the Gorgon, indicated by the orange circle debuff, which will fire an omnidirectional Petrification AoE. This time around the debuff timers will have all the gaze attacks firing at once, then the puddles dropping at the same time. Players should position around the boss, then the boss will cast Into the Shadows calling all four ads at once. Players should watch which direction they move in to determine where they will come out of the ground as last time. The boss will also summon four clones at the edges of the arena, who will all fire Gorgospit in a line AoE around the outer edge of the arena. Players need to simply avoid the edge of the arena at this point. Once the adds appear, the gaze players should turn towards their ads and petrify them while the Blood debuffed players will drop their debuff away from the ads. The boss will cast Illusory Creation, then the second set of gaze players will petrify the ads again, with the second set of puddles being dropped away from the ads. A clone will appear on the edge of the arena in line with two of the ads, and prepare to fire Gorgospit in a straight line. Players should move to center for healing and swapping players to ensure each group has both a Crown and Breath debuffed player. Once this has been determined, players will split into their light parties and move towards the ads not in line with the clone based on which direction their group is assigned, and the player with the Crown debuff will stand on one side of the ad while the other players use the ad to break that player's line of sight. The Crown player will re-petrify the ad again, and the Breath debuffed player will drop their puddle, killing the ad. Meanwhile the clone will fire its attack and take care of the other two ads. The boss will return to normal.
Following the first transformation, the boss will perform another Flameviper, then transform into the form it hasn't taken yet. After the second transformation, the boss will return to center and cast a Genesis of Flame, auto-attack twice, then enrage, become untargetable and cast Genesis of Flame, wiping the party. Players must get the boss to less than 50% health before this. If they do, a cutscene will play, the boss will enter its second phase, and players will have a checkpoint where they will restart the fight in the second phase should they die.
Phase 2
For the second phase of the fight, players should reassign clock spread positions, with tanks at the upper northeast and northwest, melee DPS at the northeast and northwest intercardinals, healers at the upper southeast and southwest, and ranged DPS at the southeast and southwest intercardinals. Players will also want to assign role spread positions, with tanks and healers on one side and the DPS on the other, with each player on their own tile spread in a square. Finally, players will need to assign in/out priorities for a later mechanic within their role spread positions.
Abilities
Please note that the boss' auto-attacks are cleaving stacked tankbusters that deal massive damage. Tanks can either remain stacked to take these throughout the fight when indicated, and all other players should move away, or a single tank can take the hits solo with an invulnerability cooldown that should also cover a preceding split tankbuster.
- Aioniopyr: Unavoidable roomwide AoE that inflicts high damage and Bleeding, requiring mitigation.
- Tyrant's Unholy Darkness: The boss targets the top two players in the enmity list for a high damage AoE tankbuster.
- Natural Alignment: Targets two random tanks/healers, or two random DPS, with a
 debuff that inflicts heavy damage over time and causes a purple sigil to appear beneath the players. The damage over time cannot be mitigated and must be healed through. If these players die or are hit by any mechanics during the duration of the debuff, the raid will instantly wipe (Forcible Failure).
 - Twist Nature: One of the sigils will start spinning and have two gauges appear over it that will begin filling at different rates, telegraphing two mechanics that will happen in sequence. The first sigil will use Forcible Fire II and Forcible Fire III. Afterwards, the second sigil will activate and use Forcible Trifire and Forcible Difreeze.
- Forcible Fire II (purple AoE icon): Each of the six players without a Natural Alignment debuff will be targeted with a medium-sized circie AoE that inflicts moderate damage and Magic Vulnerability Up, requiring players to be spread.
- Forcible Fire III (stack marker icon): One random player without a Natural Alignment debuff will be targeted with a split damage AoE that inflicts Magic Vulnerability Up.
- Forcible Trifire (flame icon): The three furthest non-debuff players from the active player with Natural Alignment will be targeted with a medium-sized circular AoE that inflicts heavy damage, Magic Vulnerability Up, and must be shared by two players each to prevent lethal damage.
- Forcible Difreeze (snowflake icon): The two closest non-debuff players to the active player with Natural Alignment will be targeted with a medium-sized circular AoE that inflicts heavy damage, Magic Vulnerability Up, and must be shared by three players each to prevent lethal damage.
- Forcible Fire II (purple AoE icon): Each of the six players without a Natural Alignment debuff will be targeted with a medium-sized circie AoE that inflicts moderate damage and
- Tyrant's Flare: A large telegraphed circular AoE that should be avoided will appear beneath each player.
- Ashing Blaze: One side of the boss will be engulfed in flame, then fire an AoE that fills the arena on that half shortly after.
- End of Days: Three Illusory Hephaistos will spawn on the west wall and use a line AoE that strikes an entire row of the arena, leaving either the first or second row of tiles safe. Afterwards, three Illusory Hephaistos will spawn on the east wall and repeat this attack, leaving the other possible row safe. Later these clones will tether to the closest player to them and will move along the outer edge of the arena based on where the player moves.
- High Concept: Massive unavoidable raidwide damage, requiring heavy mitigation, that calculates individual damage dealt based on number of players. If players are dead during this attack, their damage is spread equally amongst the living players. All players will be given a debuff:
 Multisplice: One player will receive a two-person stack debuff. Upon the 8s debuff timer expiring, a small AoE (Splicer) will resolve around them that will deal lethal damage to everyone in the AoE unless exactly two people are in it. Inflicts high damage and Magic Vulnerability Up.
 Supersplice: One player will receive a three-person stack debuff that functions similarly Multisplice to but requires three people.
 Imperfection: Alpha: Two players will receive this debuff, one with a short (8s) timer and the other with a long (28s) timer.
 Imperfection: Beta: Two will receive this debuff, one with a short timer and the other with a long timer.
 Imperfection: Gamma: Two will receive this debuff, one with a short timer and the other with a long timer.
- Perfection: Alpha/Beta/Gamma: When the Imperfection debuff timers expire, the players will emit a large AoE around them that deals high damage (Conceptual Shift) and inflicts Magic Vulnerability Up. Those players and anyone else in the AoE will receive one of three sets of symbols over their heads depending on Alpha/Beta/Gamma, with each set consisting of three colored elemental symbols, one having a ring around it ("dominant").
 Alpha: Fire (red, dominant), water (blue), and wind (green).
 Beta: Poison (yellow, dominant), lightning (purple), and wind.
 Gamma: Plant (orange, dominant), lightning, and water.
- When two players with Perfection markers stand near each other, they will tether. After a brief delay, both players will receive a "creature" (Conception) of a certain element over their heads. If both tethered players have the same Perfection markers, the element of the Conception will be the one that had the ring around it. If both tethered players have different Perfection markers, the element of the Conception will be the element that is shared between both sets of markers. Players who mixed will receive an
 Inconceivable debuff that briefly prevents them from mixing with other players.
 Fiery Conception (Red Ifrit): Alpha + Alpha. Both players will also receive a heavy damage-over-time effect.
 Toxic Conception (Yellow Gorgon): Beta + Beta. Both players will also receive a heavy damage-over-time effect.
 Growing Conception (Orange Treant): Gamma + Gamma. Both players will also receive a heavy damage-over-time effect.
 Winged Conception (Green Zu): Alpha + Beta.
 Aquatic Conception (Blue Vepar): Alpha + Gamma.
 Shocking Conception (Purple Ixion): Beta + Gamma.
- Note that Fiery, Toxic and Growing Conception are not used for the first iteration of High Concept, so making them is a failure state. Toxic and Growing Conception are not used for the entirety of the fight.
- If a player with an Imperfection debuff dies, a player with a Splice debuff does not correctly resolve it, a player with Perfection is caught in the AoE of a different signed Imperfection player, two players with Conception mix (with the exception of Winged Conception + Fiery Conception), or one player with Perfection and one with Conception mix, they will emit an unavoidable AoE (Failure of Imagination) that will instantly wipe the raid.
- Arcane Control: The boss spawns colored elemental towers (purple lightning, green wind, blue water) in two sets. The first set of two towers will appear north and south. The second set of four towers will also appear on the north-south axis. While the element is random for each set, all towers in a set will have the same element. These towers will have a countdown timer, and and require one person with an appropriate Conception buff matching the tower element to soak each tower. Failing to soak them in time will cause them to explode and instantly wipe the raid (Arcane Wave). Players who stand in a tower without the correct buff will receive a debuff (
 Electrocution,
  Windburn,
  Dropsy) that will deal massive damage over time. Players who soak the tower with the correct buff will take moderate damage (Arcane Current).
 - Deconceptualize: The boss removes all Perfection and Conception effects from the party.
- Limitless Desolation: The boss targets a tank/healer and a DPS, and attacks them in four pairs of two with a medium-sized AoE that deals moderate damage, debuffing with a Magic Vulnerability Up and a
 Fire Resistance Down II. When the Fire Resistance debuff timer reaches approximately 2 seconds, players will drop an large, telegraphed AoE (Tyrant's Flare) underneath them that they must move out of. During this time, four sets of two meteor towers will be spawning in the first three rows of the arena. Players will need to soak the meteor towers (Burst) in the order that they were hit by the boss, due to their debuffs preventing them from taking earlier meteors. Towers that are not soaked in time will inflict massive damage (Big Burst) and Damage Down to everyone, most likely resulting in a wipe
 - Inverse Magicks: The boss will give a second
 debuff to one or both players who are affected by Natural Alignment, reversing what their debuffs do (e.g, if the stack gauge fills faster, players will spread first, then stack. If the fire gauge fills faster, players will resolve Conceptual Difreeze first then Conceptual Trifire).
 - High Concept (second usage): Functions similarly to the first usage of High Concept but assigns a different set of debuffs, including one new debuff.
- Three players will receive Imperfection: Alpha/Beta/Gamma (one player per debuff) with a short timer (8s).
- Three players will receive Imperfection: Alpha/Beta/Gamma (one player per debuff) with a long timer (28s). In addition, one of these three players will receive Multisplice, while another will receive
 Solosplice, which requires them to be isolated from other players to prevent lethal damage.
 - Two players will receive no debuffs.
- Arcane Control: The boss spawns colored elemental towers in two sets. The first set of two towers will appear north and south. The second set of four towers will always occupy the middle four tiles. In the second set, two towers will always be wind (green), while the others may be both water or both lightning. The towers function similarly as they did before.
- End of Days: Four Illusory Hephaistos will spawn at the walls, one add at each cardinal. After a few seconds, each one will tether to the nearest player. The adds will follow the tethered player by moving along the outside of the arena. After a few more seconds, they will
 Bind the tethered player briefly and shoot a line AoE at them that inflicts high damage and Magic Vulnerability Up.
  Immortal Spark: A buff that is granted to players who mix Fiery Conception and Winged Conception.
 Immortal Conception: If four players receive Immortal Spark, they will automatically tether together and shortly after, emit an unavoidable raidwide AoE that deals 99% maximum HP in damage to all players. Mitigation abilities do not reduce damage taken. All players who survive this attack will be granted the Immortal Conception (Phoenix) buff.
- Three players will receive
- Ego Death: Slowcast that kills all players, wiping the fight, unless they have the Immortal Conception buff. This also acts as the enrage attack at the end of the fight. Players with Immortal Conception will not be damaged by the attack (although they will have a revive animation as though they died).
 Everburn: All players who survive Ego Death with Immortal Conception will be granted this buff, doubling the damage they inflict. This buff will be lost if the players die.
- Aionagonia: High damage unavoidable raidwide attack that inflicts a Bleeding debuff on players, and a
 Damage Up on the boss.
 - Dominion: Unavoidable raidwide that requires players to spread out. Four players (two random tanks/healers and two random DPS) will get hit by an medium-sized AoE (Orogenic Deformation) that debuffs with Earth Resistance Down II. After this four slow moving orbs of light make their way to the edge of the arena that spawn a tower when they reach a wall, dealing moderate damage (Orogenic Shift) and the same Earth Resistance Down II debuff from before to any players inside them. If they are not soaked by a player, they will explode (Orogenic Annihilation), dealing massive damage and inflicting Damage Down to everyone.
Strategy
To start the phase, the tanks will need to move close to the northern edge of the arena away from the party, as the boss' auto attacks are high damage stack tankbusters, requiring both tanks to soak them. After a few auto attacks, the boss will use Aioniopyr a heavy hitting raidwide attack that debuffs with a high damage Bleeding, so mitigation and healing are required. The boss will fire a few more auto attacks, then use Tyrant's Unholy Darkness, a tankbuster that targets both tanks (or the two highest in the enmity list) and hits them with a high damage AoE. If these are overlapped, the tanks will die. The boss will auto attack twice, then cast Natural Alignment.
Two players from the tanks/healers role and a DPS role will be targeted by this attack, be given a ![]() debuff that inflicts high damage over time, and places a purple circle beneath them. These players need to move away from players to avoid accidental damage, as if these players are hit by an attack or die, the party will be wiped. The boss will cast Twist Nature, which will set one of the circles to begin spinning, and a gauge with a marker will appear over the debuffed players' heads. When one of the gauges fills, that mechanic will be inflicted on the unmarked players, and they must handle the mechanic. If they fail the mechanic, they will take high damage. The boss will cast Tyrant's Flare, dropping large AoEs under players. Marked players should stack to the north to bait these, while the unmarked players do the same in the center of the arena. Players can also spread out in their role groups to bait the AoEs, then spread out to avoid them, as this gives a little more room on the arena. After Tyrant's Flare resolves, the first gauge will fill and the attack will fire. The marked players will be unaffected, but the marked players will have to stack or spread accordingly. After this, the boss will use Ashing Blaze, firing an AoE over half the arena. Players will identify the side of the boss that is not on fire and move to that side of the arena to avoid. At this time, the second gauge will fill, and players will handle the mechanic accordingly.
debuff that inflicts high damage over time, and places a purple circle beneath them. These players need to move away from players to avoid accidental damage, as if these players are hit by an attack or die, the party will be wiped. The boss will cast Twist Nature, which will set one of the circles to begin spinning, and a gauge with a marker will appear over the debuffed players' heads. When one of the gauges fills, that mechanic will be inflicted on the unmarked players, and they must handle the mechanic. If they fail the mechanic, they will take high damage. The boss will cast Tyrant's Flare, dropping large AoEs under players. Marked players should stack to the north to bait these, while the unmarked players do the same in the center of the arena. Players can also spread out in their role groups to bait the AoEs, then spread out to avoid them, as this gives a little more room on the arena. After Tyrant's Flare resolves, the first gauge will fill and the attack will fire. The marked players will be unaffected, but the marked players will have to stack or spread accordingly. After this, the boss will use Ashing Blaze, firing an AoE over half the arena. Players will identify the side of the boss that is not on fire and move to that side of the arena to avoid. At this time, the second gauge will fill, and players will handle the mechanic accordingly.
The second half of this mechanic has three clones of the boss spawning on the west side of the arena, leaving one row of tiles open as a safe zone. These clones will always leave the first or second row open as a safe zone. The marked players also gain new markers, a fire gauge and an ice gauge. The fire gauge targets the furthest three players from the fire marked player, and requires them to stack with another player to mitigate the attack. The ice gauge targets the two closest players and requires them to stack with three players to mitigate the attack. Players will need to first identify the safe row to handle these mechanics in, then move to that row. To handle the fire marker, the marked players should stand in the center of one of the tiles, with the unmarked players grouping in their roles (Tanks and healers on one side in their spread positions, and DPS on the other in their spread positions) organized in their in/out priority. Players who are "in" will use the edge of the tile as a distance marker, and stand on the inner side of the line on the floor to bait the attack. The "out" players will stand on the other side of the line. To make sure players are in groups of two, the role that has marked players will group together (a tank and a healer are marked, so the other tank and healer will adjust accordingly, with the "in" character moving to the "out" character). To handle the ice marker, players will group in their roles again, and the role that doesn't have marked players will send one player to the other role group to stack in groups of three. The "in"priority players will not be moving.
The first gauge and the clone AoEs will fire at roughly the same time. After that, a second set of clones will appear on the east side of the arena, leaving the first or second row from the top open as a safe zone. Players will adjust to the safe location and handle the second attack as described above. The boss will follow this up with another Aioniopyr requiring mitigation, then will fire more auto attacks, then another Tyrant's Unholy Flare followed by another auto attack. This is a high amount of damage, so healers be ready. The boss will then cast High Concept.
The raid will take high damage that needs to be mitigated and healed through, and all players will receive a debuff. If any players are dead at this point, the damage they would receive is spread across the party equally. Two players each will receive ![]()
![]()
![]() Imperfect: Alpha/Beta/Gamma with a long and short debuff timer, and the remaining two will receive a
Imperfect: Alpha/Beta/Gamma with a long and short debuff timer, and the remaining two will receive a ![]() two person stack and a
two person stack and a ![]() three person stack. When these debuffs resolve, they will explode in a large AoE, and place three elemental markers over the player's heads, as well as any player hit, with one of the markers surrounded by a ring. Two tower markers will appear in a specific color on the arena. To handle this, Alpha players with the shorter timer will move to the "A" marker on the arena, "Beta" to "B" and "Gamma" to "C". If players have not moved the markers to the corners as described above, they can simply move to a designated corner of the arena. Meanwhile, the players with the longer debuff timers will be stacking with the other players in the remaining corner. The two person stack should move to the "2" marker, and the three person marker should move to the "3" marker. To make it easier to organize where players are going, the "Beta" player will move to the two person stack marker, as they share the same color and it is easy to identify where to go, and the remaining two players move to the three person marker. The boss will cast Arcane Control and the AoEs will detonate, then assign the new markers over the players. Players with the new markers that are the same color will stand together and tether to one another and shortly thereafter receive a
three person stack. When these debuffs resolve, they will explode in a large AoE, and place three elemental markers over the player's heads, as well as any player hit, with one of the markers surrounded by a ring. Two tower markers will appear in a specific color on the arena. To handle this, Alpha players with the shorter timer will move to the "A" marker on the arena, "Beta" to "B" and "Gamma" to "C". If players have not moved the markers to the corners as described above, they can simply move to a designated corner of the arena. Meanwhile, the players with the longer debuff timers will be stacking with the other players in the remaining corner. The two person stack should move to the "2" marker, and the three person marker should move to the "3" marker. To make it easier to organize where players are going, the "Beta" player will move to the two person stack marker, as they share the same color and it is easy to identify where to go, and the remaining two players move to the three person marker. The boss will cast Arcane Control and the AoEs will detonate, then assign the new markers over the players. Players with the new markers that are the same color will stand together and tether to one another and shortly thereafter receive a ![]()
![]()
![]() "creature" corresponding to the matching color over their heads. Be warned, that if two players with the same markers in the same order attempt to stack, they will receive the dominant element
"creature" corresponding to the matching color over their heads. Be warned, that if two players with the same markers in the same order attempt to stack, they will receive the dominant element ![]()
![]()
![]() "creature" (the one with the ring around it), and take a high damage debuff. Once players have the correct "creature", they will be able to soak the tower markers. If the markers aren't soaked, they will wipe the raid. To determine where players are going, Alpha should always go north, Gamma to the south, and Beta can adjust. During this, the boss will cast Ashing Blaze, so players will have to stand in the safe half of their tower. The towers will count down, then erupt.
"creature" (the one with the ring around it), and take a high damage debuff. Once players have the correct "creature", they will be able to soak the tower markers. If the markers aren't soaked, they will wipe the raid. To determine where players are going, Alpha should always go north, Gamma to the south, and Beta can adjust. During this, the boss will cast Ashing Blaze, so players will have to stand in the safe half of their tower. The towers will count down, then erupt.
For the second puddles, players with a marker over their head can move to the safe corner, being careful not to stand too close to one another, as they can still tether and explode, wiping the raid. The debuffed players will move to their appointed locations and receive their markers the same as before. The two remaining players who had the stack debuffs will move to stand near either the Alpha, Beta or Gamma players, depending on which player is still remaining who did not end up receiving a creature in the last round. The player who did not receive a creature can call out their debuff, and the other two players will know not to stand near that marker. Four towers will appear in the center of the arena, all of the same color. To handle this, players with a long Imperfect debuff will stay in the south of the arena, and players with the short Imperfect debuff will move north. This guarantees that players with the same marker sets will not end up accidentally mixing together. The boss will use Ashing Blaze as before, so players will need to stand on the safe side of their towers once again. Players should remain spread until the boss casts Deconceptualize, removing all debuffs and markers to avoid tethering.
The boss will use another Aioniopyr, then a few auto attacks, then cast Limitless Desolation. Each player will be hit by this attack in an AoE at the same time as another player, creating pairs. Soon after getting hit, each player will drop an AoE underneath them. Each player hit will be debuffed with ![]() Magic Vulnerability Up and
Magic Vulnerability Up and ![]() Fire Resistance Down II. At the same time, sets of meteor markers will spawn on the arena. To handle this, players will split into their role spread positions to avoid overlapping AoEs, keep track of what order they are hit in, then move to take the meteor circles in the order they spawn. For example, the first players hit will wait to drop their AoEs, then take the first set of meteor markers that spawn, and so on. Players have plenty of time to adjust which meteor they are soaking, and have the entire arena to maneuver around, so this mechanic should be simple to handle.
Fire Resistance Down II. At the same time, sets of meteor markers will spawn on the arena. To handle this, players will split into their role spread positions to avoid overlapping AoEs, keep track of what order they are hit in, then move to take the meteor circles in the order they spawn. For example, the first players hit will wait to drop their AoEs, then take the first set of meteor markers that spawn, and so on. Players have plenty of time to adjust which meteor they are soaking, and have the entire arena to maneuver around, so this mechanic should be simple to handle.
The boss will auto attack twice, cast another Tyrant's Unholy Darkness, then another two tankbusters. It is recommended that the tanks both use their invulnerability skills when the boss casts to take the next three hits. The boss will cast another Natural Alignment, then also cast Inverse Magicks, giving one or both affected players a reverse ![]() debuff that will fire the opposite attack from what the marker on their gauge indicates. Otherwise the attack is handled the same as before, with players identifying where the safe row is then either stacking or spreading, then handling the fire and ice markers. To easily determine when the reversed skill is coming, players simply need to wait until the circle under the player with the reversal debuff begins to rotate. At the end of the attack the boss will follow up with another Ashing Blaze.
debuff that will fire the opposite attack from what the marker on their gauge indicates. Otherwise the attack is handled the same as before, with players identifying where the safe row is then either stacking or spreading, then handling the fire and ice markers. To easily determine when the reversed skill is coming, players simply need to wait until the circle under the player with the reversal debuff begins to rotate. At the end of the attack the boss will follow up with another Ashing Blaze.
The boss will then cast another Aioniopyr, a few auto attacks and another tankbuster followed by another auto attack. Mitigation is required here for the sheer volume of damage. The boss will cast another High Concept with the same debuffs as before, with the three person stack debuff being replaced with a single one person ![]() debuff. Two of the long debuff timer players will receive a stack debuff, and two players will have no debuffs at all. As before, the players with the short debuff move to their corners, while the player with the single player debuff moves to the "1" marker, with the two person debuff moving to the "2" marker. The final player wih the long debuff timer will move to stack with the two person marker. The two players with no debuffs will stand with Alpha, taking their markers. Two puddles will spawn on the arena as before. Two players will stack to receive the correct color creature, while the two players that had no debuffs will stack together to get the
debuff. Two of the long debuff timer players will receive a stack debuff, and two players will have no debuffs at all. As before, the players with the short debuff move to their corners, while the player with the single player debuff moves to the "1" marker, with the two person debuff moving to the "2" marker. The final player wih the long debuff timer will move to stack with the two person marker. The two players with no debuffs will stand with Alpha, taking their markers. Two puddles will spawn on the arena as before. Two players will stack to receive the correct color creature, while the two players that had no debuffs will stack together to get the ![]() Ifrit "creature" and a high damage debuff. Healers should be ready to handle this. The boss will cast Ashing Blaze, so players will move accordingly. Players with markers will move to the safe corners, and the remaining debuff players will move to their corresponding corners as before. This time, four puddles will spawn, with two of them being the green Bird puddles. Four ads will also spawn at each side of the arena. Alpha and Beta will come together to create a "creature", while the Gamma and the player from last round who did not receive a "creature" will combine, handling the towers as normal. The two players without the Ifrit "creature" will move to stand in front of the northern and southern ads, while the Ifrit players will take the east and west. Soon after, the ads will tether to the closest players to them, and begin casting End of Days untelegraphed. The players who are tethered can move their clones along the edge of the arena. The clones should be moved clockwise to the edges of the arena, and the players who are tethered should move one tile forward. This prevents any overlapping from the line AoEs fired by the ads, and protects the players in the markers as well. After the attacks resolve, the Ifrit and Zu players should stack together with all other players. This will change their markers to that of the
Ifrit "creature" and a high damage debuff. Healers should be ready to handle this. The boss will cast Ashing Blaze, so players will move accordingly. Players with markers will move to the safe corners, and the remaining debuff players will move to their corresponding corners as before. This time, four puddles will spawn, with two of them being the green Bird puddles. Four ads will also spawn at each side of the arena. Alpha and Beta will come together to create a "creature", while the Gamma and the player from last round who did not receive a "creature" will combine, handling the towers as normal. The two players without the Ifrit "creature" will move to stand in front of the northern and southern ads, while the Ifrit players will take the east and west. Soon after, the ads will tether to the closest players to them, and begin casting End of Days untelegraphed. The players who are tethered can move their clones along the edge of the arena. The clones should be moved clockwise to the edges of the arena, and the players who are tethered should move one tile forward. This prevents any overlapping from the line AoEs fired by the ads, and protects the players in the markers as well. After the attacks resolve, the Ifrit and Zu players should stack together with all other players. This will change their markers to that of the ![]() Phoenix. The boss will begin casting Ego Death, an attack that will wipe the entire party. Healers need to immediately heal every player up to full health, as the Phoenix markers will erupt, dealing 99.9% of all players health and can not be mitigated. After the explosion, all players will receive the
Phoenix. The boss will begin casting Ego Death, an attack that will wipe the entire party. Healers need to immediately heal every player up to full health, as the Phoenix markers will erupt, dealing 99.9% of all players health and can not be mitigated. After the explosion, all players will receive the ![]() Immortal Conception buff, giving a large boost to damage dealt. The boss will finish its cast, and the fight will fade out as if all players were defeated, but the party will be revived at full health shortly afterwards and receive the
Immortal Conception buff, giving a large boost to damage dealt. The boss will finish its cast, and the fight will fade out as if all players were defeated, but the party will be revived at full health shortly afterwards and receive the ![]() Everburn buff, which doubles damage dealt. (Anyone who did not have Immortal Conception will die to Ego Death and not be revived or receive this buff). Note that this buff is lost on death, so players should be careful not to die for the remainder of the fight.
Everburn buff, which doubles damage dealt. (Anyone who did not have Immortal Conception will die to Ego Death and not be revived or receive this buff). Note that this buff is lost on death, so players should be careful not to die for the remainder of the fight.
The boss will then cast Aionagonia, dealing high raidwide damage, inflicting ![]() Bleeding, and giving the boss a stack of
Bleeding, and giving the boss a stack of ![]() Damage Up. The boss will then cast Dominion, which requires players to go to their spread positions each on their own tile. The raid will take damage, and four players will be hit by an earth pillar, debuffing them with
Damage Up. The boss will then cast Dominion, which requires players to go to their spread positions each on their own tile. The raid will take damage, and four players will be hit by an earth pillar, debuffing them with ![]() Earth Resistance Down II. Overlapping these hits will kill a player. After the attack, four orbs of light will appear at the center of the arena and slowly move towards the edges of the arena. The players not debuffed by the earth pillar will each take one of these orbs, staying within it until it reaches the edge of the arena and erupts in another earth pillar, debuffing the other players with
Earth Resistance Down II. Overlapping these hits will kill a player. After the attack, four orbs of light will appear at the center of the arena and slowly move towards the edges of the arena. The players not debuffed by the earth pillar will each take one of these orbs, staying within it until it reaches the edge of the arena and erupts in another earth pillar, debuffing the other players with ![]() Earth Resistance Down II as well. By this point, the first players hit will lose their debuffs, and be able to take the second set of orbs. Each orb needs to be soaked, or the party will wipe.
Earth Resistance Down II as well. By this point, the first players hit will lose their debuffs, and be able to take the second set of orbs. Each orb needs to be soaked, or the party will wipe.
The boss will repeat this pattern again, ending with a third Aionagonia. Players need to split their mitigation on the Aionagonia, with one tank using Reprisal for each one, and the healers and DPS mitigating the Dominions. Some players also use a tank Limit Break level three if they have it by this point. Finally the boss will slow cast another Ego Death as the enrage. The boss must be defeated before this cast finishes, or the party will wipe and start over at the beginning of the phase.
Unsync strategy
With current (IL 770+) gear at level 100, phase 1 can be easily cleared without needing to prepare much beforehand, even with several deaths and damage downs. However, players will need to do Natural Alignment in phase 2 correctly as it is a strict body check.
A way of "cheesing" the fire/ice baits in Natural Alignment is to have both tanks mostly be responsible for baiting the ice or fire AoEs. This eliminates needing specific players to "flex" based on who receives the purple sigils, which is normally the most difficult part of the mechanic.
However, if a tank receives a purple sigil debuff, the party should wipe and try again.
High Concept and onwards should be skippable.
-
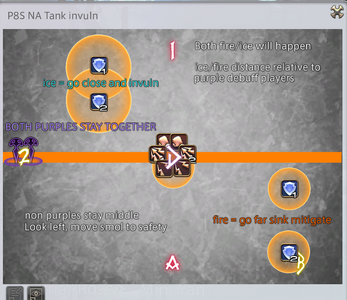 Natural Alignment unsync strategy (click to enlarge). Note: tank invulns can cover both fire and ice if timed correctly.

Loot
- 15 Allagan Tomestone of Poetics
- 1 Abyssos Mythos IV (Guaranteed)
- 1 Hephaistos Card (Drops at a fixed rate.)
Treasure Coffer 1
| Name | Type | Item Level | Rarity | Quantity |
|---|---|---|---|---|
| Paladin's Abyssos Arms (IL 635) | Other | 1 | Blue | 1 |
| Abyssos War Axe | Marauder's Arm | 635 | Blue | 1 |
| Abyssos Guillotine | Dark Knight's Arm | 635 | Blue | 1 |
| Abyssos Sawback | Gunbreaker's Arm | 635 | Blue | 1 |
| Abyssos Partisan | Lancer's Arm | 635 | Blue | 1 |
| Abyssos Sickle | Reaper's Arm | 635 | Blue | 1 |
| Abyssos Baghnakhs | Pugilist's Arm | 635 | Blue | 1 |
| Abyssos Blade | Samurai's Arm | 635 | Blue | 1 |
| Abyssos Cleavers | Rogue's Arm | 635 | Blue | 1 |
| Abyssos Compound Bow | Archer's Arm | 635 | Blue | 1 |
| Abyssos Pistol | Machinist's Arm | 635 | Blue | 1 |
| Abyssos Chakrams | Dancer's Arm | 635 | Blue | 1 |
| Abyssos Rod | Two-handed Thaumaturge's Arm | 635 | Blue | 1 |
| Abysseia | Arcanist's Grimoire | 635 | Blue | 1 |
| Abyssos Degen | Red Mage's Arm | 635 | Blue | 1 |
| Abyssos Staff | Two-handed Conjurer's Arm | 635 | Blue | 1 |
| Call of the Abyss | Scholar's Arm | 635 | Blue | 1 |
| Abyssos Orrery | Astrologian's Arm | 635 | Blue | 1 |
| Abyssos Wings | Sage's Arm | 635 | Blue | 1 |
| Abyssos Chest Gear Coffer (IL 630) |
Other | 1 | Basic | 1 |
Treasure Coffer 2
| Name | Type | Item Level | Rarity | Quantity |
|---|---|---|---|---|
| Abyssos Weapon Coffer (IL 635) |
Other | 1 | Basic | 1 |
| Sunforged Crystal |
Other | 1 | Basic | 1 |
| White Stone Black Orchestrion Roll |
Other | 1 | Basic | 1 |
Achievements
This duty is associated with the following achievements:
| Name | Points | Task | Reward | Patch |
|---|---|---|---|---|
| Savage Gaze of the Abyss I | 5 | Complete Pandæmonium: Abyssos (Savage). | - | 6.2 |
| Savage Gaze of the Abyss II | 10 | Complete Pandæmonium: Abyssos (Savage) 5 times. | - | 6.2 |
| Savage Gaze of the Abyss III | 20 | Complete Pandæmonium: Abyssos (Savage) 10 times. | - | 6.2 |
Dialogue
All lines from the boss are voice acted.
Phase 1:
- Hephaistos: Rest eternal in the dark depths of this prison. (upon pull)
- System: Hephaistos imbues his arms with scorching flame. (Conceptual Tetraflare/Octaflare)
- Hephaistos: Sear flesh from bone! (Volcanic Torches)
- Hephaistos: Leave naught but ash in your wake! (Sunforge)
- Hephaistos: Let seep sorrow into your heart. (Sunforge resolves)
- Hephaistos: Behold the fruits of sacrifice! (Reforged Reflection)
- Hephaistos: You will know my rage! (Rearing Rampage)
- Hephaistos: Fools, braying before a god! (Stomp Dead)
- Hephaistos: I shall see my wish fulfilled. (Second Reforged Reflection)
- Hephaistos: You are prey to be consumed! (Into the Shadows)
- Hephaistos: Perish in flame's embrace! (Fourfold Fires)
- Hephaistos: Go forth, and sate your boundless hunger! (Cthonic Vent)
- Hephaistos: From fulgent flame my servants rise! (Sunforge after Fourfold Flames)
- Hephaistos: I tire of this farce! (Sunforge resolves)
- System: Hephaistos imbues his legs with scorching flame. (Conceptual Tetraflare/Diflare)
- Hephaistos: Be crushed underfoot! (Blazing Footfalls)
- Hephaistos: This is the end... (Genesis of Flame enrage)
- Hephaistos: Godhood is within my grasp... I need only reach... (50% health)
Cutscene:
- Hephaistos: Even should my vessel crumble...
- Hephaistos: I shall take hold...of my reward!
- Hephaistos: If I must tear this wretched world down...I shall!
- Hephaistos: Athena...How I long for our reunion...
Phase 2:
- Hephaistos: Receive of me death...and be honored! (upon pull)
- Hephaistos: My will is absolute! (Twist Nature)
- Hephaistos: Rejoice, and partake of my gift! (High Concept)
- System: An alien concept infiltrates your very being... (High Concept)
- System: From concepts aligned is a new creature born! (combining Perfection debuffs)
- Hephaistos: Your feeble flame must be snuffed out! (Ego Death and enrage)
- System: The concept of the Phoenix returns you from the brink of death! (after cutscene)
- Hephaistos: Yes... Hehehe... At last! (after cutscene)
- Hephaistos: Surrender to oblivion! (Aionagonia)
- Hephaistos: Embrace annihilation! (Dominion)
Music
| Section | Theme |
|---|---|
| Phase 1 | Embers |
| Phase 2 | White Stone Black |
Gallery


History
In Patch 6.21, the HP of Hephaistos was reduced by approximately 3% in Phase 1 and 1% in Phase 2, making this the first Savage encounter to be "nerfed" when it was current, since Alexander - The Cuff of the Son (Savage) in Patch 3.26. According to Square Enix, this was because the fight was tested for a longer period of time than normal, increasing the skill of the playtesters and resulting in an overtuned HP value that created a very tight DPS check when the raid was released [1]. Regardless, this problem exacerbated complaints from players regarding some jobs—such as paladin, warrior, reaper, machinist, and red mage—being "undertuned" in terms of their DPS, sometimes to the point of exclusion from parties.