Job Gauge
Official Lodestone Job Guide (Always up-to-date)
Introduction
Job Gauge refers either to an user interface element first added during Stormblood (patch 4.0) that is used to track Job's specific resources or to resource itself. This includes, but is not limited, to:
- Elements used to track uptime of Job's specific buffs. For example Dark Knight's Darkside.
- Elements used to track numerical value (usually 0 to 100) of available resources. For example Paladin's Oath or Samurai's Kenki.
- Elements used to track number of available stacks (usually 0 to 3) of a specific Job Gauge. For example White Mage's Lily or Scholar's Aetherflow.
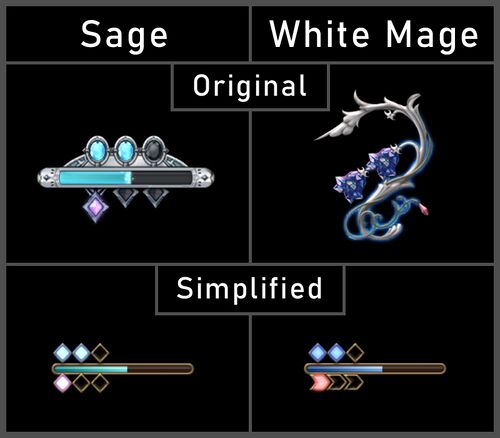
Multiple resources can be shown in a single UI element, for example Sage's Addersgall Gauge shows progress bar for replenishing Addersgall, current amount of Addersgall stacks and current amount of Addersting stacks.
Some gauges can be unevenly split into multiple UI elements, for example Samurai has 3 resources - Sen, Kenki and Meditation stacks. Sen has its individual UI element, while Kenki and Meditation stacks share the same UI element.
In PvP, Job Gauges were previously present but have been removed with the PvP job overhaul in patch 6.1.
The Job Gauge Description may be viewed from the "Actions and Traits" window, with a ? button at the bottom of the window.
Simple Job Gauge
Simple Job Gauges are simplified versions of the original UI element. They contain same information as the original, but they do not have unnecessary graphical components, like background images or overwhelming animations. Simplified Job Gauges of different Jobs often look very similar if they work on a similar basis. For example, the simplified version of White Mage's Healing Gauge is nearly identical to Sage's Addersgall Gauge, while their original versions are easily distinguishable because of their distinct graphical design.
Switching between Normal/Simple Modes
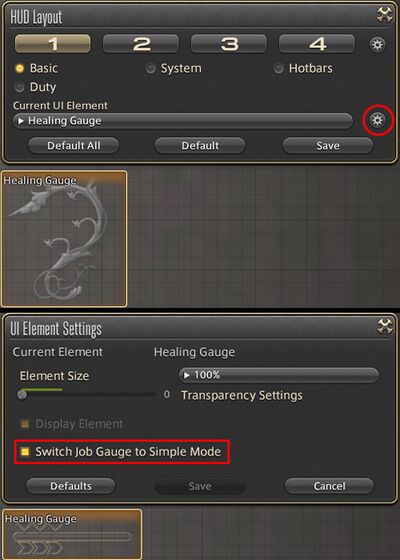
You can switch between the normal and simple versions of the Job Gauge display through the individual HUD layout options.
- You will need to be on the job for which you want to change your Job Gauge.
You can also switch between the two versions using the following text command:
/jobhudmode
If there are more Job Gauges available, assign a number to switch the specific Job Gauge display:
/jobhudmode [number]
For Samurai, Job Gauge 1 is the Kenki Gauge, and 2 is the Sen Gauge.
If Job has multiple UI elements, you can mix and match them however you want. You can use simplified Kenki Gauge while simultaneously using normal Sen Gauge or any other combination.
Settings for both styles of Job Gauges are saved on the HUD layouts 1 through 4 individually, so you can switch between all sorts of modes as you like.
Tanks
All Tanks have gauges that change their design to reflect whether they have their respective tank stance active.
- Oath is charged by auto-attacks. Auto-attack for Paladin occurs every 2.24 seconds, meaning it takes 44.8 seconds to charge gauge from 0 to 100. The accumulated Oath can then be consumed for Sheltron, Holy Sheltron, Intervention or Cover.
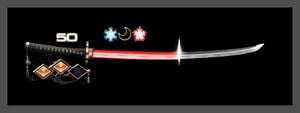
- Whether tank stance Iron Will is active is indicated by a golden background picture in normal mode, or by a small symbol on the left of the gauge in simple mode.
- Beast gauge charges by using most of the regular weaponskills and by the ability Infuriate. Gauge can be spent for heavy hitting attacks like Fell Cleave.
- Whether tank stance Defiance is active is indicated by a background picture in normal mode, or by a small symbol on the left of the gauge in simple mode.
- Charged using weaponskills Souleater or Stalwart Soul. Gauge can be spent on abilities such as Bloodspiller or Quietus. Using Delirium provides three stacks which can be used for certain abilities without using up Blood Gauge.
- Whether tank stance Grit is active is indicated by a glow and animation of the left side picture in normal mode, or by a small symbol on the left of the gauge in simple mode.
- Shows remaining duration of Darkside.
- Shows whether Dark Arts is available.
- Shows remaining duration of Living Shadow.
- Single Cartridge is gained by finishing basic combo. Three Cartridges are gained by using Bloodfest (only two at lower levels).
- Cartridges can be spent on damage-oriented abilities such as Burst Strike, Gnashing Fang, and Double Down.
- Whether tank stance Royal Guard is active is indicated by a red pulsating symbol in normal mode, or by a small symbol on the left of the gauge in simple mode.
Healers
- Every 20 seconds in combat, White Mage will gain a lily up to a total of three. Lilies can be spent on the spells Afflatus Solace and Afflatus Rapture.
- Each spent lily will provide a blood lily. After getting three blood lilies, Afflatus Misery will be available for execution.
- Scholar gets three Aetherflow stacks by using the ability Aetherflow or Dissipation. Aetherflow stacks are used for abilities Lustrate, Indomitability, Excogitation, Sacred Soil, and Energy Drain.
- Cost of Aetherflow stack for Indomitability and Excogitation can be nullified by using Recitation.
- Every skill which requires an Aetherflow stack to execute also grants 10 Fae Aether as long as the Faerie is currently summoned.
- Fae Aether is used by Aetherpact, which continuously drains the gauge.
- Using Astral Draw or Umbral Draw will each draw four cards, which are displayed on this gauge.
- The actions Play I, Play II, Play III, and Minor Arcana will turn into the currently drawn cards. Using them will consume the card, causing it to disappear from the gauge.
- Activated by using Eukrasia. While active, certain abilities such as Diagnosis are replaced by an alternate version such as Eukrasian Diagnosis until the activation is consumed.
- Addersgall charges passively every 30 seconds, with a maximum of three stacks. Additionaly, one stack can be gained by using Rhizomata. Addersgall can be used for certain healing abilities, all of which restore 700 MP on use.
- Addersting stack is gained whenever a barrier created by Eukrasian Diagnosis or the self-barrier created by Eukrasian Prognosis is destroyed. Each stack can be used to execute Toxikon or Toxikon II.
Melee DPS
- Tracks how many Beast Chakra the monk has obtained (up to three).
- Tracks whether Lunar Nadi and Solar Nadi are obtained.
- When Beast Chakra are full, a Masterful Blitz attack becomes available depending on how many unique Beast Chakra are obtained.
- When both Lunar and Solar Nadi are obtained, Tornado Kick ( Phantom Rush once upgraded) becomes available.
- Tracks how many Chakra the monk has obtained (up to five).
- When full, Chakra can be used on strong attacks such as The Forbidden Chakra.
- Tracks stacks of the First Brood's Gaze, which is gained by executing High Jump ( Jump on lower levels), followed by Mirage Dive. Once the First Brood's Gaze reaches its maximum level, the Dragoon can execute Geirskogul to gain Life of the Dragon. While under the this effect, Geirskogul changes to more potent Nastrond, which can be used once Nastrond Ready.
- Once the trait Lance Mastery IV is learned, the gauge will also track Firstminds' Focus, a stackable resource that is obtained by using Raiden Thrust or Draconian Fury. When Firstminds' Focus is full (two stacks), the user can execute Wyrmwind Thrust.
- Charged by executing weaponskills and by the ability Meisui. Can be used for Hellfrog Medium, Bhavacakra, and Bunshin.
- Tracks stacks of Kazematoi, which is gained in increments of two by executing Armor Crush as part of a combo. Using Aeolian Edge consumes one stack in exchange for increased potency.
- Kenki Gauge is gained through executing most regular weaponskills or with the ability Ikishoten. Kenki can be spent for Hissatsu abilities.
- Meditation Gauge requires three Meditation stacks in order to execute Shoha. Meditation stacks can be gained by executing Iaijutsu moves, Ogi Namikiri, or Meditate.
- Tracks the three Sen (Setsu, Getsu, and Ka) that Samurai can acquire by executing combos ending with Yukikaze, Gekko ( Mangetsu), and Kasha ( Oka) respectively. Sen allows you to execute Iaijutsu moves. The type of actions depends on current amount of Sen – single Sen for Higanbana, two Sen for Tenka Goken, and three Sen for Midare Setsugekka.
- Souls are accumulated upon executing certain weaponskills and by defeating enemies under the effects of Death's Design from Shadow of Death ( Whorl of Death). Souls can be used to execute Blood Stalk, Grim Swathe, and Gluttony.
- Shrouds are acquired by executing certain weaponskills, and can be used to execute Enshroud.
- Lemure Shroud stacks can be used to execute several actions such as Void Reaping, Cross Reaping, Grim Reaping, and Communio.
- Void Shroud is gained when stacks of Lemure Shroud are used. These can be used to execute several actions such as Lemure's Slice and Lemure's Scythe.
Physical Ranged DPS
- Appears whilst singing Army's Paeon, The Wanderer's Minuet, or Mage's Ballad, and displays a timer that tracks the remaining duration of the song.
- Series of musical notes or arrowheads appear when using Army's Paeon or The Wanderer's Minuet respectively. Whenever a Repertoire is triggered, these symbols will light up, granting the following effects:
- For each note of Army's Paeon that is lit up, the Bard's weaponskills and spells are cast faster and have shorter recast times, and auto attacks are faster.
- For each note of The Wanderer's Minuet that is lit up, the potency of the Pitch Perfect skill is increased.
- For each note of Mage's Ballad that is lit up, recast time of both Bloodletter and Rain of Death is reduced by 7.5 seconds.
- The Soul Voice Gauge tracks a resource that increases every time Repertoire is triggered. At least 20 Soul Voice is required to use Apex Arrow, which consumes all gauge upon execution. However, the potency of Apex Arrow is maximized if at least 80 Soul Voice is consumed.
- Each time a different song is played, its corresponding Coda will be displayed on the Coda Gauge. These are used to execute Radiant Finale, which requires at least one unique Coda. The potency of Radiant Finale's buff is maximized if all three different Coda are active.
- Heat is a resource gained from a basic single-target or AoE combo. The action Hypercharge requires 50 Heat to use. Barrel Stabilizer will instantly increase Heat by 50.
- Battery is a resource gained from successfully completing a single-target combo, using Hot Shot / Air Anchor, or Chain Saw. The actions Rook Autoturret and Automaton Queen require at least 50 Battery to use and will consume all current Battery. The potency of Rook Autoturret or Automaton Queen's attacks will increase with higher Battery consumption.
- Displays specific dance moves that need to be executed in shown order to successfully complete dance (either Standard Step or Technical Step). If the Dancer is currently not in dance mode, the gauge shows Standard Finish's remaining time.
Fourfold Feathers and Esprit Gauge:
- Most weaponskills grant Esprit, which is used to execute Saber Dance.
- Certain weaponskills have a chance to grant a stack of Fourfold Feathers, which are used for Fan Dance and Fan Dance II.
Magical Ranged DPS
- Tracks level of Astral Fire or Umbral Ice.
- Tracks number of Umbral Hearts (gained by casting Blizzard IV, Freeze, or Umbral Soul). Umbral Hearts reduce the cost of fire spells when in Astral Fire and are spent when casting fire spells ( Flare instantly spends all remaining hearts). Losing Enochian removes all Umbral Hearts.
- Tracks Enochian timer and status, which is activated whenever Astral Fire or Umbral Ice is entered and is lost when neither Astral Fire or Umbral Ice is active.
- Tracks number of Polyglots (spent to cast Foul or Xenoglossy). Polyglots are gained every 30 seconds Enochian is active or by using Amplifier.
- Tracks charge of Paradox.
- A stack of Astral Soul is gained per use of Fire IV or Flare while under the effect of Astral Fire, up to a maximum of six. All six stacks can be consumed to cast Flare Star.
- Two stacks of Aetherflow are granted from using Energy Drain (single target) or Energy Siphon (AoE). One Aetherflow is required to execute the off-global cooldown attacks Fester (single target) or Painflare (AoE).
- The Trance Gauge has three functions. First, it tracks Arcanum, three different colored jewels. Each one is used to summon a different pet, which will perform a powerful AoE attack and augment the user's spells. Second, it tracks the current duration of Aethercharge, which later upgrades to Dreadwyrm Trance, and later still to the combat duration remaining for Demi-Bahamut after learning Summon Bahamut. Finally, after learning Summon Phoenix, the gauge will indicate whether the next Demi-Primal summon will be Demi-Bahamut, Demi-Phoenix, or Lunar Bahamut.
- Tracks current amount of black and white mana, gained by spells such as Jolt, Veraero, and Verthunder. If the two kinds are in great imbalance, thy crystal on top will start glowing with the dominant element, halving the other's gain.
- When both kinds of mana are charged up, certain melee attacks (such as Riposte) are Enchanted (such as Enchanted Riposte), and will deal significantly increased damage while consuming both kinds of mana.
- After executing enchanted melee attack, the Red Mage gains a Mana stack. At three stacks, Verflare or Verholy are able to be executed.


